Your Ad Here

they say..


ShoutMix chat widget

How to create a secured and locked folder in Windows XP

Friday, June 27, 2008

Since some people were having issues with this method of hiding a folder in XP (folder being renamed incorrectly, visible via the command prompt, etc), I am adding to the bottom another way to permanently hide a folder using a program called Free Hide Folder. Please scroll down to read about it.

If you’ve come across this page looking for a way to create a password protected, secure, hidden or locked folder in Windows XP for free, you’ve come to the right place. Unfortunately, Windows XP does not have any user-friendly built-in tools to create secure folders on computers with multiple users. Of course, you can encrypt data on your hard disk, but this only helps if your computer is stolen.

This method is useful if you want to hide a folder or file and you’re pretty sure that anyone who is using the computer will have no idea how to un-hide the data. If you’re dealing with someone a little more computer savvy, there is another way to create a secure locked folder without having to buy any 3rd party software.

It basically involves using a script to morph the folder into something completely different so that it’s still visible, but nothing inside the folder is accessible. In order to view the data, you have to run another script to morph it back. Anyone who clicks on the folder will be brought to the Control Panel and simply think it is a shortcut.

Here are the steps to create the protected folder in Windows XP:

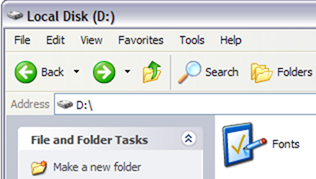
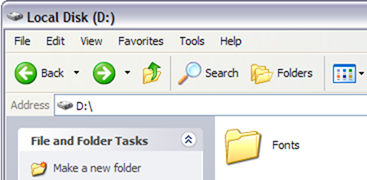
  • First create a folder that you will use to store your confidential data. For example, I have created a folder called Fonts at the root of my D drive. Since the hidden folder will bring you to the Control Panel, it’s best to name the folder as one of the programs inside there.

createsecurefolder1

  • In the same location where you created the new folder, create a new file in Notepad, copy the following below into it, replace Fonts with the name of your folder and save it as loc.bat.

ren Fonts Fonts.{21EC2020-3AEA-1069-A2DD-08002B30309D}

  • To save the file as a .bat file in Notepad, just put the whole thing in quotes, like “loc.bat” and then click Save.

hiddenfolder

  • Now you should have a bat file named loc in the same directory as your Fonts folder, not inside the Fonts folder.

lockedfolders1

  • Create another NotePad file and type in the following listed below and save it as “key.bat”.

ren Fonts.{21EC2020-3AEA-1069-A2DD-08002B30309D} Fonts

  • Now you’ll have loc.bat and key.bat along with your folder. Go ahead and double-click on loc.bat and your folder will turn into the Control Panel and nothing inside can be viewed. Clicking on it will simply bring you to the Control Panel. You’ll notice the icon should have changed also.

protectedfolders

  • To view the data inside your folder again, click on key.bat and your folder will return to normal! Pretty simple!

Of course, keeping the key.bat file in the same folder will defeat the purpose of securing the folder, so it’s best to move the key.bat file somewhere else, or even better, put it on a USB stick or CD that only you can access.

Most people will be probably look at the folder and simply ignore it since it has the control panel icon and it links directly there. Of course, if someone knows this trick also, they can create their own key.bat file, etc and open it back up. However, if you’re dealing with someone who can do all of that, it’s best you check out more advanced 3rd party software to lock down a folder.

Read more...
How to track the original location of an email via its IP address

Here’s a quick how-to guide on how you can track email to it’s originating location by figuring out the email’s IP address and looking it up. I have found this to be quite useful on many occasions for verification purposes . Tracking the IP address of an email sender does require looking at some technical details, so be ready to dig your heels in!

There are basically two steps involved in the process of tracking an email: find the IP address in the email header section and then look up the location of the IP address.

Finding the IP address of an email sender in GMail, Yahoo Mail, and Outlook

Let’s go ahead and take a look at how you would do this for Google, Yahoo and Outlook since those are the most popular email clients.

Google’s Gmail

1. Log into your account and open the email in question.

2. Click on the down arrow that’s to the right of the Reply link. Choose Show Original from the list.

track emails

Now here’s the technical part that I was telling you about earlier! You need to look for the lines of text that start with “Received: from“. It might be easier to simply press Cntrl + F and perform a search for that phase. You’ll notice that there are several Received From’s in the message header. This is because the message header contains the IP addresses of all of servers involved in routing that email to you.

message header

To find the first computer that originally sent the email, you’ll have to find the Received From that’s farthest DOWN. As you can see from the above image, the first one is from a computer called “aseem” with the IP address 72.204.154.191. Then it was routed to my ISP’s server at eastrmmtao104.cox.net and so on and so forth till it got to your email server.

The computer aseem is my personal home computer and that’s my public IP address for my house! I’ll go through Yahoo and Outlook before talking about tracking the location of that IP address.

Yahoo Mail Beta

1. Log into your account and open the email (if you’re using Yahoo Mail Beta with the new preview interface, make sure you double-click on the email so that it opens in a new tab)

2. At the top right, you’ll see there is a drop-down option where Standard Header is selected by default.

3. Click on it and choose Full Header.

yahoo header

Again, you’ll see the same information as before, just in a different window:

message headers

Microsoft Outlook

1. Open the email in Outlook by double-clicking on it

2. Go to View at the top menu (the menu options for the email, not the main Outlook window) and choose Options.

outlook message headers

You’ll get a dialog box where you can set the message options and at the bottom you’ll see the Internet Headers box. For some silly reason, the box is very small and you have to scroll a lot, so it’s best to simply copy and paste the text into Notepad to view it more easily.

internet headers

Tracking the location of an IP address

Now that we have our originating IP address of 72.204.154.191, let’s find out where that is! You can do this by perform a location lookup on the IP address. My favorites are IP2Location and GeoBytes IP Locator.

GeoBytes gave me a big map of New Orleans, LA along with a bunch of other information about the location itself.

find ip address location

IP2Location also gave me the same information pretty much, including the ISP (Cox Communications). Of course, this is correct since I live in New Orleans!

If you want more information, you can do a WHOIS database search also. My favorite one is the ARIN WHOIS Database Search. This will give you information on who hosts that IP address and their registration information. You can always contact them to try and find more information on that particular IP address.

Read more...

How to move your mouse cursor without a mouse

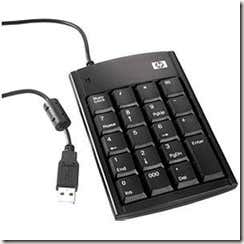
Please check before you attempt to do this that you have a numeric keypad, as this is the only requirement for this. A numeric keypard resembles this:

Numeric Keypad

Option 1: MouseKeys

Okay, so, the first way of doing this, is by using a feature that is built in by windows, called MouseKeys. To turn on MouseKeys, go on Control Panel, click on Accesibility Options, click on the tab that says Mouse, and check the ‘Use MouseKeys‘ box. Alternatively, you could turn on MouseKeys by pressing Left ALT + Left Shift + Num Lock at the same time. Please note that this only works with the LEFT alt and shift, as if you try it with the right side, it will not work.

Here are the controls, provided that you have a numeric keypad, to run MouseKeys.

  • 2 = Move Down
  • 8 = Move Up
  • 4 = Move Left
  • 6 = Move Right
  • 7 = Move Diagonally Top Left
  • 9 = Move Diagonally Top Right
  • 1 = Move Diagonally Bottom Left
  • 3 = Move Diagonally Bottom Right
  • 5 = Simulate Mouse Single Left Click
  • (+) = Simulate Mouse Double Click
  • (-) = Simulate Mouse Right Click
  • (*) = Simulate Both Mouse Buttons Click At Once
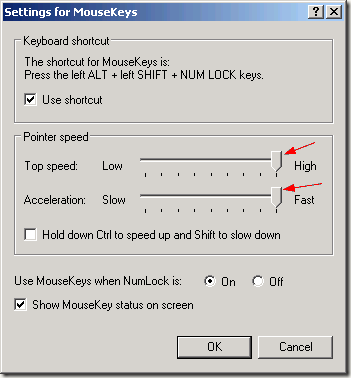
  • If you’ve tried this, you may have noticed that the speed of the cursors is really slow. To speed this up, you just go into Settings, and change the speed.

    Settings For MouseKeys

    Just drag the sliders along to the maximum speed and acceleration, and it should be absolutely fine.

    Option 2: Mouse Emulator

    Mouse Emulator works in a very similar way to mouse keys, except I find it slightly better, as it has a better diagonal moving control than MouseKeys. It’s a small and free program, only 10kb, downloadable here http://www.geocities.com/pronto4u/mouseemulator.html. It’s a simple, download and run program, so no installing needed.

    Here are the controls for Mouse Emulator,

  • 5 = Move Down
  • 8 = Move Up
  • 4 = Move Left
  • 6 = Move Right
  • 1 = Simulate Mouse Single Left Click
  • 2 = Simulate Mouse Right Click
  • 3 = Simulate Mouse Middle Click
  • 7 - Mousewheel up (Scroll)
  • 9 - Mousewheel down (Scroll)
  • CTRL + 0 - Enable/Disable Mouse Emulator
  • If you’re wondering where Mouse Emulator went after you ran the program, it should be in your toolbar, looking like this:

    Mouse Emulator Toolbar Icon

    So, there you have it, two clean and effective ways of using your computer, even if your mouse has died.

    Read more...

    How to convert a PDF file to Word, Excel or JPG format

    One common question I’ve run across a lot these days in the office is how to convert a PDF file to Microsoft Word format (doc), Excel format (xls), or JPG picture format. Usually, people want to know how to convert a file to PDF, but it’s also nice to be able to convert back the other way. Converting to Word is actually pretty simple and can be done directly using an online file conversion service called Zamzar. Going to Excel or JPG is a two step process, but nothing very difficult to follow.

    Update: There’s a much easier way to convert a PDF to JPG image format than the method I have mentioned below. Here’s how you can do it using Zamzar.com.

    Convert a PDF file to JPG - Easy Way

    Go to ZamZar.com, browse for your file and choose PNG format for the format to conver to under Step 2. PNG is another newer picture format that is slowly replacing the JPG format. Most programs that can open JPG files can open PNG. Zamzar automatically converts each page in the PDF document into it’s own PNG picture file. Now you can simply open Microsoft Paint (yes, all you need it Paint!) and choose File - Save As from the menu and choose JPEG from the drop down list of formats.

    microsoft paint


    Convert PDF to JPG Format - Second Way

    The first thing you’ll need to do is download a free software (the only one I could find) that converts PDF documents to JPEG image format automatically. Go to the Omniformat download page and download both Omniformat v8.3 and the PDF995 app. You will need to download and install PDF995 first before installing Omniformat. Once you have both programs installed, go to your Start Menu programs, find the program group Software995 and click on Omniformat.

    software995.jpg

    The only annoying thing about this program is that it requires you to view some ads for about 30 seconds! However, it’s better than paying $20 or $40 for a program just to do a simple conversion! It does pop up another instance of your browser window for the web site of each of the sponsors, but it does not install any spyware onto your computer (no popup ads). Once the program is loaded, you’ll see it has a section called “Watch Folders” and then a button at the bottom titled “Start Monitoring” and “Single Pass“.

    pdf-to-jpg.jpg

    Basically the way it works is that you need to COPY the PDF files you want to convert to JPG format to the C:\omniformat\watch folder and then press Single Pass. The program will look in that directory and convert each page of each PDF into a separate JPG file. If you click Start Monitoring, you can keep dropping PDFs into that folder and the program will automatically convert them into JPGs as long as the program is open. Note that the program DELETES the original PDF document that it uses, so that’s why you need to COPY the PDF document to the watch folder, not move it! You should now see your converted files like below:

    pdf-to-jpg-convert.jpg

    Convert your PDF to a Word document

    Go to Zamzar.com and click the Browse button next to Step 1 and choose your file. By default, Step 2 will be set to DOC format, but you can choose to convert your PDF to other file types such as TXT, HMTL, RTF, etc. Type in your email address for Step 3 and click Convert.

    file conversion

    You should receive an email within a few minutes with a download link to your converted file. I have tried out this service on some pretty complex PDF documents with text in multiple columns, multiple images, etc and have been very impressed with it’s conversion accuracy.

    Convert a PDF file to Excel format

    We will again follow the steps above using Zamzar, but this time choose TXT as the format you want to convert to. Unfortunately, you can’t convert straight to Excel format, so we’ll have to go through the intermediary TXT format. Once you have downloaded the TXT file and saved it on your computer, open Microsoft Excel and go to File - Open and change the Files of Type combo box to All Files.

    convert pdf to excel

    Now you should see the converted text file in the list of files. Choose it and click Open. You’ll now be brought to the Text Import Wizard. You have to open the file in this manner because if you simply right-click and say Open With Excel, all of the text for each row will appear in the first column and not be separated.

    For Step 1, choose Delimited from the two options listed.

    convert pdf to word

    Click Next and check off the Space checkbox as one of the delimiters. Each value should now be separated by a vertical line, indicating it’s going to be in a separate column.

    convert pdf to jpg

    Click Next and then click Finish. You can now save the file as an Excel file by going to File - Save As. There are a few drawbacks, however, as this conversion does not always work perfectly! For example, if the original Excel sheet had a column where there was text with spaces included, each word will be separated into it’s own column! Also, you won’t see any formulas or functions that may have been in the original Excel sheet, only the text.

    It’s as easy as that! You can use many other image editing programs also such as Photoshop, Corel, etc, etc, but I chose Paint because that is universally available on just about every Windows computer.

    Read more...
    How to save boomarks in Firefox and IE??

    Want to save your Firefox or IE bookmarks for backup purposes? I’ve built up so boomarks in the last year that if I were to lose them because of a computer crash, it would be devastating! That’s why it’s important to backup your Mozilla Firefox bookmarks as well as IE bookmarks, if you’re using both.

    I’ll walk you through the steps to export your bookmarks from Firefox first and then IE. The process is fairly simple, but it’s all different in Firefox 2, Firefox 3, and IE.

    How to save bookmarks from Firefox 3

    Firefox 3 has been out in beta and will officially be out soon, so first we’ll go through the steps in this version. Open your Firefox browser and click on Bookmarks and then Organize Bookmarks.

    organize bookmarks

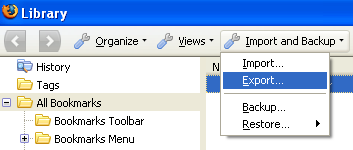
    You should see the Import and Backup button at the top right. Click on it and choose Export. This will save your bookmarks to an HTML file. You can also click Backup, but this saves it automatically to the local computer. Backup is useful if you deleted items from your bookmarks and need to restore them back.

    backup bookmarks

    Make sure to save your files onto an external device for backup purposes. You can also import the bookmarks onto another computer using the same procedure, except choose Import.

    How to save bookmarks from Firefox 2

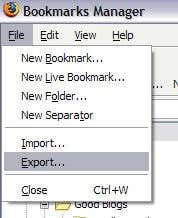
    Just like in Firefox 3, you first have to go to Bookmarks and then Organize Bookmarks before you can export or save your bookmarks. In Firefox 2, there is no Import and Backup button, you instead have to click on File and then choose Export.

    export bookmarks

    It will save your bookmarks to an HTML file that you can then import on another computer if you like or save as a backup.

    How to save bookmarks from IE 7

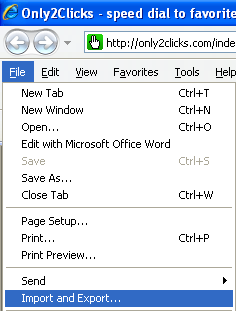
    In IE, the procedure is slightly different. If you look under Favorites, you’ll see the option Organize Favorites, but that’s not the way to save bookmarks in IE. Instead you have to click on File and then Import and Export.

    import and export

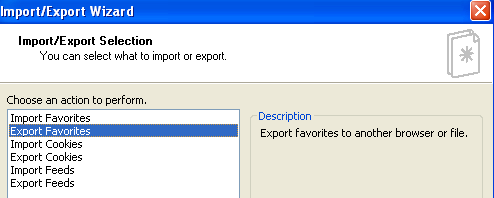
    Click Next and then choose what you would like to export. You have the option to Export Favorites, Export Cookies, or Export Feeds.

    export favorities

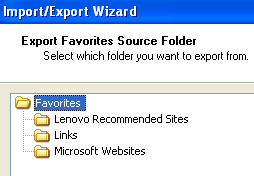
    Click Next and then choose the folder you would like to export. Click on the Favorites folder to export ALL of the bookmarks.

    ie export bookmarks

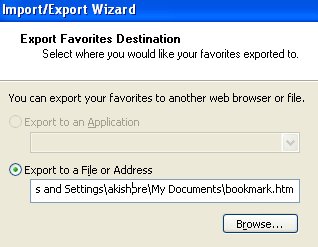
    Click Next and then browse to the location where you want to save the HTML file. You can use the same procedure to import bookmarks back into IE.

    save bookmarks

    That’s it! You’ve now saved your bookmarks from Firefox and IE and hopefully will never lose any of them! Enjoy!

    Read more...
    Followers

    Quote on!!

    Never expect things to happen, struggle and make them happen. Never expect yourself given a good value, create a value of your own.

    Send me a Post

    To send me a any posts about tricks, jokes, windows, mobiles, interesting things or technical. Please mail me at srikanthreasons420@yahoo.com