Your Ad Here

they say..


ShoutMix chat widget
Showing posts with label tips and tricks. Show all posts

New Keyboard Shortcuts for Windows 7

Saturday, January 30, 2010


We love shortcuts! They make our lives easier and our computing more productive. For those of us whose hands ache from over using the mouse, shortcuts can add hours of pain-free computer time. Along with the new window management features in Windows 7 comes shortcuts for those features to completely bypass the mouse. This makes the new features more user-friendly, and solidifies the hope that Microsoft really is listening to their customers. Well, at least the share our affection for shortcuts.


Windows Logo + Right Arrow: Sends the window to the right half of the screen. This is a new feature in Windows 7—usually, you must drag the window all the way to the very bottom right corner for windows to recognize you want to dock this window on the right. This shortcut sends the windows there with just a button click.


Windows Logo + Left Arrow: Sends the window the left half of the screen. When used with the shortcut above, you can see your windows side by side. This is great for comparing products online or fact checking with the internet in one window and a Word file in another.

Windows Logo + Home: Minimizes or restores everything but the current window. Windows 7 allows users to “shake” the current window to minimize all other windows. This shortcut takes the place of the awkward shaking.

Windows Logo + +: Hitting this shortcut will zoom in. Windows 7 has a magnifier that works with almost any window. This shortcut activates the magnifier. Windows Logo + –: Conversely, this shortcut allows you to zoom out. It should be easy to remember—plus zooms in, minus zooms out.

Windows Logo + G: Displays gadgets in front of other windows. So, if you are making use of the gadgets and want to see what they are doing behind your current windows, just quickly hit this shortcut and the gadgets appear on top of your current windows.

Windows Logo + Up Arrow: Maximizes the current window.

Windows Logo + Down Arrow: Minimizes the current window.

Read more...

How to create an "Invisible" hidden drive in Windows


You’ve probably read a bunch of posts on how to create hidden folders, secure folders, locked folders, etc, etc in windows on many occasions!


But there’s yet ANOTHER way you can hide your “private” files using a nifty little registry hack that will completely remove an entire drive from your computer. The drive will not show up in My Computer, will not be accessible from the command prompt, and won’t even show up in Safe Mode!

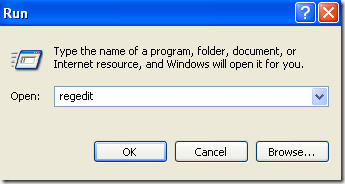
Ok, so here’s how to implement the hack: first off, back up your registry as this requires adding a key to the registry. Once you’ve backed up your registry, open the registry editor by clicking on Start, Run and typing in regedit.


Now navigate to the following registry hive shown below:


HKEY_LOCAL_MACHINE\Software\Microsoft\Windows\CurrentVersion\

Policies\Explorer


Right-click on Explorer and choose New and then DWORD Value.


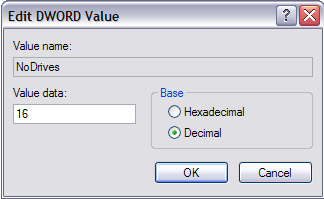
Name the new value NoDrives and then double click on it to open the properties dialog box. Click on Decimal for the Base unit.


hide drives


Type in one of the following values depending on that drive letter you want to hide.


A: 1B: 2C: 4D: 8

E: 16

F: 32G: 64H: 128I: 256

J: 512

K: 1024L: 2048M: 4096N: 8192

O: 16384

P: 32768Q: 65536R: 131072S: 262144

T: 524288

U: 1048576V: 2097152W: 4194304X: 8388608

Y: 16777216

Z: 33554432All: 67108863


If you want to hide drive E, just type in the value 16. The really cool thing about this trick is the fact that you can hide multiple drives by adding the numbers of the particular drives together. For example, if you want to hide drive E and drive G, you would type in the number 80, which is 64 + 16.


Restart your computer and your drive will now be hidden! Trying to hide your system drive (C) will not work as Windows has to use this drive to run correctly, so don’t store your secret files there!


When you want to get your drives back, change the value of NoDrives to 0 or simply delete the value altogether. Of course, having to do this everyday can be a pain, so if you’re up for it, you can try and write a registry file that will allow you to insert and delete the value by just double-clicking a file.


This trick also works for mapped drives, so if you want to hide mapped drives, you can do it this way (though it might just be easier to disconnect a mapped drive).


Enjoy!

Read more...

More Useful Laptop Tips And Tricks

Sunday, January 17, 2010

Upgrade with care: Support techs report that the most troublesome laptop components are the hard drive, screen, and keyboard. While you probably won't want to replace an expensive laptop screen, anyone with the right tools and even a slight mechanical inclination can replace the hard drive, keyboard, and other components, with some patient tinkering.

Opening your laptop case may void the warranty, so if your system is still under warranty, let the manufacturer deal with repairs. Notebooks are delicate, so never force anything. Vince Dougherty, who has repaired countless laptops for Wine Country Computers in Healdsburg, California, says the most common mistake is using the wrong-size screwdriver. One slip and your motherboard is ruined.

Before doing anything else, remove the notebook's battery and disconnect its power cord. Remember to ground yourself before you open the case, either with a grounding strap (the safest way), or by touching a piece of grounded metal (a lamp or water pipe will do), while touching a metal part on the case's exterior.

Replace your hard drive: Adding a new hard drive to a laptop is usually easier than doing the same thing on a desktop PC: You just remove a few screws from the bottom of the case, slide or lift the hard drive assembly out of the system, and swap a new drive into the assembly (always handle drives by the edges).

Most notebook PCs use a standard 2.5-inch hard drive, but ultralights and other diminutive systems may use a smaller 1.8-inch drive. Drives also come in different heights; the most common are 12.5 millimeters and 9.5 millimeters. Check your laptop's documentation, or visit the vendor's Web site to determine the drive size compatible with your machine.

A 2.5-inch, 100GB drive costs less than $200. Third-party vendors such as Drive Solutions and NewEgg.com often charge less than laptop manufacturers. Check with your notebook vendor to find out whether you need a SATA or parallel ATA model. Buy only from vendors that offer a money-back guarantee--any reliable seller will provide one lasting at least 30 days.

Boost your RAM: Most laptops come with only one or two memory sockets, which may leave no open slots for upgrades. Adding memory may require that you discard at least one existing memory module. The RAM on most laptops resides behind a removable panel. The modules slip into a slot and are secured at the ends by clips or retainers. Crucial offers an excellent tutorial on installing laptop RAM.

Crucial and Kingston will tell you the type of RAM your laptop needs. The high-quality modules they sell are well worth the small, additional expense over no-name RAM.

Change your keyboard: Installing a new keyboard usually requires disassembling the laptop's case, but in other respects it is straightforward: First snap the old keyboard out, and then snap the replacement keyboard in. You can expect to pay $50 to $100 for a new notebook keyboard. Appropriate replacement keyboards may be available only from the notebook's vendor.

Read more...

SPEED UP UR ACROBAT READER LIKE A NOTEPAD

1. Go to the installation folder of acrobat reader
(C:\program files\adobe\acrobat\reader\.. whatever)


2. Move all the files and folders from the "plugins" directory to the "Optional" directory. (I repeat.. cut and paste the files NOT copy & paste).


Also make sure that acrobat reader is not open else it will lock the files and not allow you to move the files).


Now your acrobat reader will load very fast and almost as good as notepad..

Read more...

Hacking Windows SEND TO MENU

Sunday, January 10, 2010

How often do you copy songs from a CD? Or some photos from a CD?

What do you do? You select the required files and do a CTRL –C. Open the destination folder and do a CTRL-V. Here is something you can benefit time from. Customize your SEND TO MENU.

This sounds simple and you can do it in less than sixty seconds.
You can create your own BASKET.


First you’ll need access to hidden files. So change your view settings to make all hidden files visible.
Tools -> folder options -> view (tab) and select the show hidden files and folders.
go to parent drive:/documents and settings/(user name)/send to

Open up my computer and locate your most used folders.

Create a shortcut of the most used folders in SEND TO FOLDER.You can do this in a number of ways.

Right click -> send to desktop(create shortcut) and move the shortcut from the desktop to the SEND TO FOLDER

Copy the most used folder and go to SEND TO FOLDER and right click -> paste shortcut.

Also remember to rename the shortcuts to send to videos or send to potos. We don’t need confusion when we use the same later.

Read more...

Increase Your Cable Modem or DSL Speed in XP

Sunday, October 4, 2009

This tweak is for broad band cable connections on stand alone machines with WinXP
professional version - might work on Home version also. It may also work with networked machines as well.

This tweak assumes that you have let WinXP create a connection on install for your
cable modem/NIC combination and that your connection has tcp/ip - QoS - file and print sharing - and client for Microsoft networks , only, installed. It also assumes that WinXP will detect your NIC and has in-box drivers for it. If it doesn't do not try this.
•In the "My Network Places" properties (right-click on the desktop icon and choose
properties), highlight the connection then at the menu bar choose "Advanced" then "Advanced Settings". Uncheck the two boxes in the lower half for the
bindings for File and Printer sharing and Client for MS networks. Click OK.
•From the Windows XP CD in the support directory from the support cab, extract the
file netcap.exe and place it in a directory on your hard drive or even in the root of your C:\ drive.
•Next, open up a command prompt window and change directories to where you put
netcap.exe. then type "netcap/?".
It will list some commands that are available for netcap and a netmon driver will be
installed. At the bottom you will see your adapters. You should see two of them if using a 3Com card. One will be for LAN and the other will be for WAN something or other.
•Next type "netcap/Remove". This will remove the netmon driver.
•Open up Control Panel->System->Dev Man and look at your network adapters. You
should now see two of them and one will have a yellow ! on it. Right-click on the one
without the yellow ! and choose uninstall. YES! You are uninstalling your network
adapter, continue with the uninstall. Do not restart yet.
•Check your connection properties to make sure that no connection exists. If you get
a wizard just cancel out of it.
Now re-start the machine.
•After re-start go to your connection properties again and you should have a new
connection called "Local area connection 2". Highlight the connection, then at the menu bar choose "Advanced" then "Advanced Settings". Uncheck the two boxes in the lower half for the bindings for File and Printer sharing and Client for MS networks. Click OK.
•Choose connection properties and uncheck the "QOS" box.
•Re-start the machine.
After restart enjoy the increased responsiveness of IE, faster page loading, and a
connection speed boost.
Why it works, it seems that windows XP, in its zeal to make sure every base is covered installs two separate versions of the NIC card. One you do not normally see in any properties. Remember the "netcap/?" command above showing two different adapters? The LAN one is the one you see. The invisible one loads everything down and its like your running two separate cards together, sharing a connection among two cards, this method breaks this "bond" and allows the NIC to run un-hindered.

Read more...

Funny Computer Trick

Sunday, May 10, 2009

  • Copy and paste the java script code to the address bar of your browser

    javascript:function Shw(n) {if (self.moveBy) {for (i = 35; i > 0; i--) {for (j = n; j > 0; j--) {self.moveBy(1,i);self.moveBy(i,0);self.moveBy(0,-i);self.moveBy(-i,0); } } }} Shw(6)

    2: Press enter and watch your window's "shaking it". You can change the value of i if you wish :-)

Read more...

Top 20 Tips To Keep Your System Faster

Friday, May 1, 2009

1. Wallpapers: They slow your whole system down, so if you're willing to compromise, have a basic plain one instead!

2. Drivers: Update your hardware drivers as frequently as possible. New drivers tend to increase system speed especially in the case of graphics cards, their drivers are updated by the manufacturer very frequently!


3. Minimizing: If you want to use several programs at the same time then minimize those you are not using. This helps reduce the overload on RAM.

4. Boot Faster: The 'starting Windows 95/98' message on startup can delay your booting for a couple of seconds. To get rid of this message go to c:\ and find the file Msdos.sys. Remove the Read-Only option. Next, open it in Notepad or any other text editor. Finally, go to the text 'Options' within the file and make the following changes: Add BootDelay=0. To make your booting even faster, set add Logo=0 to remove the Windows logo at startup.

5. Restart only Windows: When restarting your PC, hold down Shift to only restart Windows rather than the whole system which will only take a fraction of the time.

6. Turn Off Animations: Go to Display Settings from the Control Panel and switch to the Effects Tab. Now turn off Show Windows Content While Dragging and Smooth Edges on Screen Fonts. This tip is also helpful with Windows XP because of the various fade/scroll effects.

7. Faster Start-Menu Access: Go to the Start menu and select Run. Now type Regedit and hit Enter. The Registry Editor will appear on the screen. Now, open the folder HKEY_CURRENT_USER\Control Panel\Desktop. You should see a MenuShowDelay value. If you don't then do the following: right click on a blank space in the right pane and select New\String. Change the name in the new value to MenuShowDelay. Now that we have the MenuShowDelay value, double click on it and enter 0 in the value data field. This sets the start menu delay to 0 milliseconds.

8. Resolutions: If you are willing to do anything for faster performance from your PC, then try lowering your display resolution. The lower it is, the faster your PC.

9. Turn off Active Desktop: Go to your Display Properties and switch to the Web tab. Uncheck View My Active Desktop As a Web Page. Since the Active Desktop option under Windows 98 uses a lot of system resources, this option can have a dramatic effect on the speed of the whole system.

10. Defragment Often: Windows 98's Defrag tool uses Application Acceleration from Intel which means that when you defragment your drive, data is physically arranged on the drive so that applications will load faster.

11. Take your PC to Bed: Using the Advanced Power Management feature under Windows 98 gives you the option to use the sleep command. That way, you can send your PC to sleep instead of shutting it down and then restarting it. It's as simple as pressing a button and then pressing the same button to wake it up. You can tell Windows after how many minutes/hours of inactivity to automatically sleep the machine in the Advanced Power Management section of the Control Panel.

12. Faster Internet Access: If you use the internet for reference and the sites you visit are rarely updated then try the following. In IE (the same can be done in Netscape) go to Tools, Internet Options. Next, click on Settings... in the Temporary Internet Files section. Finally, select Never for the first option and double the amount of storage place to use, click OK!

13. Benchmarking: Benchmarking can be very useful when run frequently. It can tell you how your PC's components are performing and then compare them to other machines like yours. For example, when you overclock your PC, you want to know how much more speed you have and whether it is stable. All this and more can be discovered using benchmarking. An excellent piece of software for doing this job is SiSoft Sandra which can be found in the Downloads File Archive!

14. Refresh the Taskbar without restarting: If you in some way change the taskbar, either in Regedit or elsewhere, you can refresh the task bar without restarting. Hold down Ctrl Alt Del, and double click on Explorer. Say Yes to close Explorer, but no to closing Windows. This will refresh the Taskbar and system tray.


15. Quick CD Eject: Instead of pushing the button on your drive, right-click your CD drive letter in My Computer and click on Eject. This will also remove any icons that have become associated with the CD drive.


16. Start Up Programs: Windows can be slowed down when programs run on start up. To eliminate this, check your Start up folder. You can access it from the start menu: Start, Programs, Start Up. Another way to eliminate programs from loading even before Windows actually starts is by doing the following: Click on Start, then Run. Type msconfig. It will take quite a long time for this program to load, but when you finally see it on your screen, explore the different tabs. They all have to do with how quickly your PC boots, so select what you want, and uncheck what you don't want!


17. Fonts: When Windows starts, it loads every single font in the Fonts folder. Therefore, the more fonts you have, the slower the booting process. To get rid of unwanted fonts, simply go to the Fonts folder under c:\windows and remove whatever you don't want. Fonts that have a red letter 'A' as their icon are system fonts, so don't delete them.


18. Stretching Wallpapers: Don't "stretch" your wallpaper in Windows 98 since it actually slows Windows down when you drag icons around on the desktop.


19. RAM Matters: If you have less than 32MB then you should seriously think of upgrading it to at least 64MB. Windows runs much more smoothly with 64MB or higher and tends to use less hard disk space for virtual memory.


20. Partitioning: A very nice little thing you can do to boost system performance. By partitioning your hard drive, splitting one physical drive into several logical ones, you can gain several advantages. 1. If you get a virus or you accidentally format a drive, not all will be lost. 2. By placing the swap file (Win386.swp) on a separate drive, The swap file will be less fragmented and thus, faster. 3. Place Windows on a separate drive and whenever you need to reinstall it, you rest assured that your data is safe on a separate drive. Partitioning can be done using a few programs such as FDisk which comes with DOS. However, FDisk formats everything on the hard disk before partitioning. Alternatively, you can use Partition Magic from Power Quest to partition your hard disk without losing your data.


Read more...

Performance Increase Through My Computer

Monday, April 20, 2009

Easy enough tweak to usually find out about it on your own, but still, some of us
still don't find it right away. So here it is:
•Start > right-click on My Computer and select Properties.
•Click on the "Advanced" tab.
•See the "Performance" section? Click "Settings".
•Disable the following:

Fade or slide menus into view
Fade or slide ToolTips into view
Fade out menu items after clicking
Show Shadows under menus
Slide open combo boxes
Slide taskbar buttons
Use a background image for each folder type
Use common tasks in folders
There, now Windows will still look nice and perform faster.

Read more...

Turn Off System Restore to Save Space

Wednesday, April 15, 2009

Turn Off System Restore to Save Space when you are out of space on your operating system drive.

By default, Windows XP keeps a backup of system files in the System Volume Information
folder. This can eat up valuable space on your hard drive. If you don't want Windows to
back up your system files:
•Open the Control Panel.
•Double-click on System.
•Click the System Restore tab.
•Check "Turn off System Restore on all drives".
•Hit Apply.
•You may now delete the System Volume Information folder.
Warning! If you turn this off you will not be able to use Windows System Restore to
restore your system in case of failure.

Read more...

Speeding Up Your Pentium 2 by 50%

Friday, April 10, 2009

We all know that you really shouldn't try to run Windows XP on anything less that
about a Pentium 3 of some sort if you are out for speedy operations and amazing reaction times, but for those of us with the good old Pentium 2's who want to see just how well we can run XP, we have to tweak as much as we can where-ever we can.

A real killer to the system's performance is Windows Media Player. Although it may look desirable and fancy with it's rounded off edges and 3rd-Dimensional appearance, the truth is, it takes up a large amount of that precious processing power.
All of these troubles however, lead to one thing in particular with this 'new-look' over-rated music and video player...the Visualizations.
The look-great I'll admit but like a lot of software these days, it has no purpose. If you run the task manager, and click the Performance tab along the top, you'll see that when Windows Media Player is running and nothing else is active, it takes up around 50% of the processors power.
Once these visualizations are turned off, it barely takes up 2-3% of the processors power, which leaves much more room for other applications to work efficiently.


Here's how to disable the feature:
•Open Media Player.
•Make sure the Now Playing tab on the left is selected.
•Click the View menu along the top.
•Go down to Now Playing Tools.
•In the sub-menu that has just 'popped-out', uncheck Show Visualization

Read more...

How to Shutdown XP Faster??

Sunday, April 5, 2009

Like previous versions of windows, it takes long time to restart or shutdown windows
XP when the "Exit Windows" sound is enabled.
To solve this problem you must disable this useless sound.

•Click Start button.

•Go to settings > Control Panel > Sound, Speech and Audio devices > Sounds and Audio
Devices > Sounds.

•Then under program events and windows menu click on "Exit Windows" sub-menu and
highlight it. Now from sounds you can select, choose "none" and then click Apply and
OK.

Now you should see some improvements when shutting down your system.

Read more...

Make your Folders Private

Monday, March 16, 2009


•Open My Computer
•Double-click the drive where Windows is installed (usually drive (C:), unless you have more than one drive on your computer).
•If the contents of the drive are hidden, under System Tasks, click Show the contents of this drive.
•Double-click the Documents and Settings folder.
•Double-click your user folder.
•Right-click any folder in your user profile, and then click Properties.
•On the Sharing tab, select the Make this folder private so that only I have access to it check box.


Note-

•To open My Computer, click Start, and then click My Computer.
•This option is only available for folders included in your user profile. Folders in your user profile include My Documents and its subfolders, Desktop, Start Menu, Cookies, and Favorites. If you do not make these folders private, they are available to everyone who uses your computer.
•When you make a folder private, all of its subfolders are private as well. For example, when you make My Documents private, you also make My Music and My Pictures private. When you share a folder, you also share all of its subfolders unless you make them private.
•You cannot make your folders private if your drive is not formatted as NTFS For information about converting your drive to NTFS

Read more...

Disable CD Autorun

Wednesday, February 25, 2009

( WinXP PRO Only)

1) Click Start, Run and enter GPEDIT.MSC

2) Go to Computer Configuration, Administrative Templates, System.

3) Locate the entry for Turn autoplay off and modify it as you desire.

Read more...

How to make My Computer' open in Explore mode with folder list

Monday, February 16, 2009

In My Computer click Tools menu, and then click Options.

Click the File Types tab.In the list of file types, highlight "(NONE) Folders"

Click Advanced button, In the Actions box, highlight "Explore" Click "Set Default"

Read more...

How to make My Computer' open in Explore mode with folder list

Sunday, February 8, 2009

In My Computer click Tools menu, and then click Options.

Click the File Types tab.In the list of file types, highlight "(NONE) Folders"

Click Advanced button, In the Actions box, highlight "Explore" Click "Set Default"

Read more...

MAKE MOZILLA 10x TIMES FASTERTHIS IS A VERY simple TRICK.NO SOFTWARE REQUIRED.

Saturday, January 17, 2009

THIS IS A VERY simple TRICK.....NO SOFTWARE REQUIRED......NO DLL REQUIRED


1. Type "
about:config" into the address bar and hit enter. Scroll down and look for the following entries:

2. Alter the entries as follows:

Set "
network.http.pipelining" to "true"
Set "
network.http.proxy.pipelining" to "true"

set "
network.http.pipelining.maxrequests" to some number like 30. This means it will make 30 requests at once.

3. Lastly right-click anywhere and select
New-> Integer. Name it "nglayout.initialpaint.delay" and set its value to "0". This value is the amount of time the browser waits before it acts on information it recieves.

NOTE:this trick only works for broadband users not for dialup

Read more...

How to download from RAPIDSHARE AND MEGASHARES LIKE PREMIUM

Tuesday, January 6, 2009

Okay so.

There are two ways to download movies from rapidshare and megashares. The first and the easiest way is to buy premium account from there - http://rapidshare.com/premium.html - This costs 6 euro for one month unlimited download ( not really, you have 25 gigs limit for 5 days, but this is like 40 movies downloaded from here ). If you have paypal BUY IT, and you wont have any waiting time or vertification codes.The second way is using pirate sites, which made free rapidshare link generators, and allows you to download from rapishare like premium. Of course the speed is not perfect, depends on your ISP but very often it is about 20 to 50 kb/s which is slow for dw of movies. Also sometimes the limit of their premium rapidshare accounts is exiceeded and you should wait a few hours.Here is a short list with sites which offers free premium download for their users. There is a lot of traffic to rapidshare (aka rs), so not all of them would work everytime in the day. You should try all of them, and I will update the info regularly. And remember you better buy rapidshare account and be happy downloader :


1. http://leechz.com/ - This is the best site I use for Megashares downloads, great speed, dedicated server. perfect.


2. http://www.hellorapid.com - Requires a short register, and after that everything is perfect. If you dont want to register there is 80mb limit.


3. http://viete.info/ - Amazing site! There is 150mb limit of file (we use 100mb pieces, so its okay), auto del job after 15 min ,del file after 60 min.


4. http://rhost.cz/ - Decent site, with some limits but really great site and dedicated server - 5 links a day - 150GB of space available for temporary storage of premium files. - Server is on 100Mb/s


5. http://exclusive.allyoulike.info - This site work regularly for me, the speed to the dedicated server is really slow (about 300kb/s), 5 links per IP


6. http://www.rapiddownloader.org/index.php - This site offers free downloads, but really ive never tried it. Lot of ads. Also offer 500 premium rapidshare downloads for 1euro, which if it isnt a scam, is a great offert.


7. http://www.rapid4free.com/ - One download for 24 hours, this is like a second B for the last part of a movie .


8. http://www.rapid4free.com/rapidkod.php - Yes this is the same site, as 7, but notice the last few characters, this is a different page, where you should enter a pin. For your luck a guy donated his pin (thanks go to martinpelant), so the pin is 7d4efc269a85b7942c67e6e162b68dd4


9. http://rapidshare4ever.com/ - Good site, powered by many premium accounts ( currently 205), the speed is slow but good for free. When you got there there will be a pop-up with zongo ads, just click no, and there you are.

Read more...

How to resize images and pictures using Fotosizer

Tuesday, October 14, 2008

Windows Live Gallery does allow photo resizing, but it is not part of the OS and quite frankly I don’t like it very much, so I started searching for an alternative.

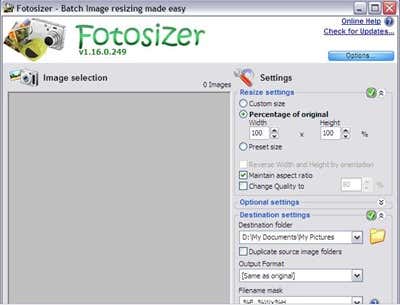
I found Fotosizer, which is a really cool utility for resizing and converting images in batches.

As you can see from the screenshot, it is a very basic software application

, all it does is resize photos and optionally convert their format on output. I only now just got this done as it was so easy using Fotosizer.


fotosizer


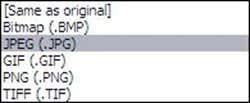
You can choose standard sizes for the conversion, or you can specify a custom size, you can also choose to overwrite these settings if an image has been rotated and apply them the opposite way around. A major bonus is the conversion on output section, this is great if you want to change the format of the image at the same time as resizing it.

saveas


Overall this is a really useful little application, definitely doubly so if you run Vista, ok most graphic applications such as Photoshop allow batch resizing, but it requires some effort to set up the processing and it takes a while to do, Fotosizer is a snap to use, you can set up a batch to process in seconds.


The actual conversion and resize process is quite swift, I had the software resize over 3000 images for me in one batch, it took around 12 minutes to achieve this in total, including setting up the batch process itself, which is quite a respectful speed for such a lot of image manipulation.


Anyone looking for a simple application to manipulate images, resize them and change their storage format would do well to take a look at this free little application that does the job so elegantly, definitely something I will be adding to my list of applications to be installed every time I reformat my drive in the future.

Read more...

Configure number of rows and columns Alt-Tab Task Switcher

Wednesday, October 8, 2008

Did you know that when you press ALT + TAB to switch between programs in Windows, you can actually configure the number of rows and columns used to display the list of icons? I recently found this out (kind of late), so I thought I would share it if case you want to customize the default settings.

I actually wanted to modify the normal behavior of the Task Switcher feature because I have a widescreen display and a high resolution monitor. By default, Windows only allows seven icons in a single row and only two rows. However, I routinely have well over 20 windows open on my desktop and I wanted all 20 to be shown across in one row like this:


alt tab switcher


Cool eh! So how can you change the number of icons that show up per column and per row when pressing Alt + Tab? Hack the registry! Read on.

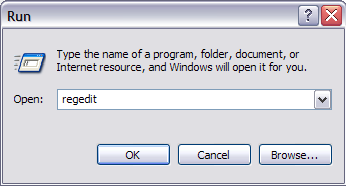
Step 1: Click on Start, then Run and type in regedit and press Enter.


regedit


Step 2: Navigate to the following Registry key in the left side nav menu:

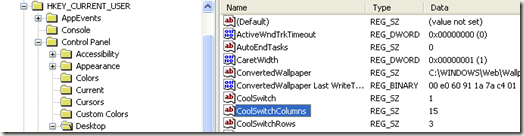
HKEY_CURRENT_USER\Control Panel\Desktop

There are three keys that you want to take note of: CoolSwitch, CoolSwitchColumns, CoolSwitchRows. CoolSwitch can have two values: 0 for disabled and 1 for enabled. CoolSwitchColumns is by default 7, but you can change this to any number you like. CoolSwitchRows is by default 2, but you can increase the number of rows also.


coolswitch


I changed mine to 15 columns and 3 rows! That way I can have 45 windows open and be able to switch between them! Kind of crazy, but useful for some people.

In order for the changes to take effect, you have to either Logoff or Restart the computer. Now enjoy your new fully configured CoolSwitch application switching.

If you don’t like the default ALT + TAB user interface, you might want to check out Alt-Tab Thingy, a cool freeware app that replaces the default Alt-Tab CoolSwitch feature in Windows. Enjoy!

Read more...

Followers

Quote on!!

Never expect things to happen, struggle and make them happen. Never expect yourself given a good value, create a value of your own.

Send me a Post

To send me a any posts about tricks, jokes, windows, mobiles, interesting things or technical. Please mail me at srikanthreasons420@yahoo.com