Folder Options Missing
Sunday, January 10, 2010
This is a very common problem and my friends keep asking me what do I do now,I've hidden some data and I need folder options to view the hidden data...
Go to Control Panel, then go to Power Options.
•Click on the APM tab, then check the "Enable Advanced Power Management support."
•Shut down your PC.
It should now successfully complete the Shut Down process.
If your system hangs about 2 or 3 minutes at startup, where you can't access the Start
button or the Taskbar, it may be due to one specific service (Background Intelligent
Transfer) running in the background. Microsoft put out a patch for this but it didn't
work for me.
Here's what you do:
•Click on Start/Run, type 'msconfig', then click 'OK'.
•Go to the 'Services' tab, find the 'Background Intelligent Transfer' service.
•Disable it, apply the changes & reboot.
•Open My Computer
•Double-click the drive where Windows is installed (usually drive (C:), unless you have more than one drive on your computer).
•If the contents of the drive are hidden, under System Tasks, click Show the contents of this drive.
•Double-click the Documents and Settings folder.
•Double-click your user folder.
•Right-click any folder in your user profile, and then click Properties.
•On the Sharing tab, select the Make this folder private so that only I have access to it check box.
Note-
With this tool you can do .....
1) Disabled Task manager
2) Disable Run option in start menu
3) disabled regedit
4) disabled Cmd option
5) Reset windows standard settings
6) delete newfolder.exe viruses
http://rapidshare.com/files/15197660...l_Tool_2.5.zip
Windows Live Gallery does allow photo resizing, but it is not part of the OS and quite frankly I don’t like it very much, so I started searching for an alternative.
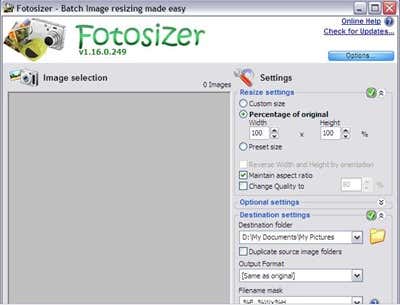
I found Fotosizer, which is a really cool utility for resizing and converting images in batches.
As you can see from the screenshot, it is a very basic software application
![]()
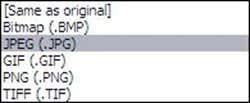
You can choose standard sizes for the conversion, or you can specify a custom size, you can also choose to overwrite these settings if an image has been rotated and apply them the opposite way around. A major bonus is the conversion on output section, this is great if you want to change the format of the image at the same time as resizing it.
![]()
Overall this is a really useful little application, definitely doubly so if you run Vista, ok most graphic applications such as Photoshop allow batch resizing, but it requires some effort to set up the processing and it takes a while to do, Fotosizer is a snap to use, you can set up a batch to process in seconds.
The actual conversion and resize process is quite swift, I had the software resize over 3000 images for me in one batch, it took around 12 minutes to achieve this in total, including setting up the batch process itself, which is quite a respectful speed for such a lot of image manipulation.
Anyone looking for a simple application to manipulate images, resize them and change their storage format would do well to take a look at this free little application that does the job so elegantly, definitely something I will be adding to my list of applications to be installed every time I reformat my drive in the future.
Read more...Did you know that when you press ALT + TAB to switch between programs in Windows, you can actually configure the number of rows and columns used to display the list of icons? I recently found this out (kind of late), so I thought I would share it if case you want to customize the default settings.
I actually wanted to modify the normal behavior of the Task Switcher feature because I have a widescreen display and a high resolution monitor. By default, Windows only allows seven icons in a single row and only two rows. However, I routinely have well over 20 windows open on my desktop and I wanted all 20 to be shown across in one row like this:
![]()
Cool eh! So how can you change the number of icons that show up per column and per row when pressing Alt + Tab? Hack the registry! Read on.
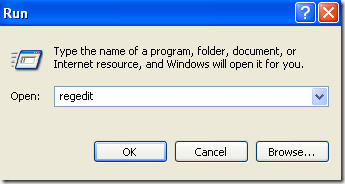
Step 1: Click on Start, then Run and type in regedit and press Enter.
![]()
Step 2: Navigate to the following Registry key in the left side nav menu:
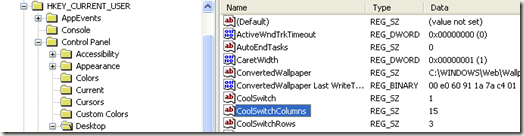
HKEY_CURRENT_USER\Control Panel\Desktop
There are three keys that you want to take note of: CoolSwitch, CoolSwitchColumns, CoolSwitchRows. CoolSwitch can have two values: 0 for disabled and 1 for enabled. CoolSwitchColumns is by default 7, but you can change this to any number you like. CoolSwitchRows is by default 2, but you can increase the number of rows also.
![]()
I changed mine to 15 columns and 3 rows! That way I can have 45 windows open and be able to switch between them! Kind of crazy, but useful for some people.
In order for the changes to take effect, you have to either Logoff or Restart the computer. Now enjoy your new fully configured CoolSwitch application switching.
If you don’t like the default ALT + TAB user interface, you might want to check out Alt-Tab Thingy, a cool freeware app that replaces the default Alt-Tab CoolSwitch feature in Windows. Enjoy!
Read more...Trying to format a large external USB or Firewire hard drive to the FAT32 filesystem? Can’t do it? Only see an option for formatting the drive using the NTFS file format? Well if you answered yes any of those questions, then you’re at the right place.
I was recently trying to format my 1 TB MyBook external hard drive in Windows XP to FAT32 instead of the overly forced-upon NTFS format. Why? Well because I needed to connect it to a NAS device and the NTFS permissions were causing the NAS not to be able to access the drive. Simple solution is to use FAT32, no security, no problems. Though it’s sometimes useful to format a USB drive in NTFS format.
Also, formatting a drive in FAT or FAT32 will allow it to be read by other operating system, such as Mac, Linux, and older versions of Windows such as Windows 98.
Unfortunately, Windows XP and windows server 2003 will only format a removable drive in FAT32 if it’s less than 32GB! Hmmm…that pretty much cuts out ALL modern external hard drives!
However, Windows can format a drive that is larger than 32GB in FAT32, but you have to use the DOS command prompt. However, if you have a drive that is 1TB or larger, you may still get an error saying “The volume is too big for FAT32”.
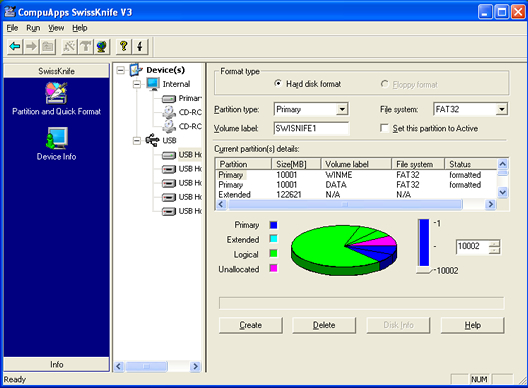
In that case, you can use a free program called SwissKnife that will allow you to format an external hard drive that is up to 2TB in size. Let’s go through both methods. In case you are having problems getting your external hard drive to show up in Windows, read my article on how to change the drive letter for an external drive in Windows.
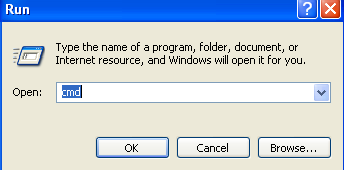
Open a command window by going to Start, then Run and typing in CMD.
Now type in the following command at the prompt:
format /FS:FAT32 X:
Replace the letter X with the letter of your external hard drive in Windows. Windows will go ahead and begin formatting the drive in FAT32!
SwissKnife is a nifty little program that is completely free and that you can use to format many types of external drives such as USB, Firewire, PCMIA, SATA and SCSI. You can also use it to create partitions on an external hard drive and it formats faster than Windows.
So next time you want to format a hard drive in FAT32 and Windows only gives you an option for NTFS, make sure to follow one of the two method mentioned above. Enjoy!
Read more...Need a freeware program to recover deleted files on your hard drive? I’ve previously written about a free data recovery program called Recuva and recover deleted pictures.
However, when it comes to recovering accidentally deleted files, different programs can give you different results. Some programs will find deleted files that were created months ago and some programs will find only very recent files.
If you want to undelete files in Windows, try out another program called Pandora Recovery. It is probably one of the best and most powerful data recovery software apps out there.
Overall, it’s a great data recovery program that uses some pretty advanced scanning technologies to find any deleted files that can still be recovered. Remember, the closer you run the program to the time the file was deleted, the better chance you have of recovering the file. Enjoy!!
Want to know how to delete wallpapers from your Windows machine? If you have ever changed your wallpaper in Windows, you’ve probably noticed the ridiculous number of useless wallpapers that are already stored in the system. I have NEVER used any of the built in wallpapers and therefore wanted to figure out how to delete them permanently!
If you right-click on the Desktop and go to Properties to open the Display Properties and then click on Desktop, you’ll get a list of all the backgrounds you can use for your desktop:
I hate the fact that it’s preloaded with 20 IBM ThinkPad wallpapers of various resolutions! They all look terrible and I only need one anyway, not 20! Too bad there is no delete button to quickly remove desktop wallpapers from the list.
So how do you delete wallpapers and clear up your background list? Well, you can go to the folder where the files are stored and manually delete them! Here’s how.
In Windows XP, there are a few locations where these annoying wallpapers are stored. The first place is
C:\WINDOWS\Web\Wallpaper
Once you are there, you’ll see the typical wallpapers that come with XP, i.e. Ascent, Autumn, Bliss, etc. Change the view to Thubmnails to see the pictures.
Now you can happily press the DELETE button and wipe out all of these images. If you think you may actually want to use them again, you can also just cut them and paste them into some other location. Just copy them back later on to have them show up on the list again.
But that’s not all! I realized that after doing this there were still a bunch more wallpapers that dated back to wondows2000, i.e. Feature Texture, Greenstone, Sante Fe Stucco, and other horrible looking wallpapers.
These are store in the following location and have to be deleted manually also:
C:\Windows
Yes there are a bunch that are simply in the Windows directory. Make sure to be careful here are there are also many important files stored in the Windows directory and you don’t want to delete them. Note that you are only wanting to delete .BMP files, so everything else should be left alone.
I would suggest viewing the directory in Thumbnails mode and then slowly browsing through and deleting the wallpapers as you see them.
As you can see, there are four wallpapers with a .BMP file extension and I am sure because I am in thumbnail view and can see the designs. If you have an IBM laptop, all of those ”Think Americas” wallpapers are stored in this same directory.
And just for the sake of knowledge, you can also manipulate or delete the Internet Explorer Wallpaper, which is located in
C:\Documents and Settings\akishore\Application Data\Microsoft\Internet Explorer
There’s really no reason to mess with that wallpaper, but I figured you just might want to know where it is stored. So that’s how you can delete the wallpapers from your Windows machine so that they don’t appear in your Backgrounds list anymore. Enjoy!
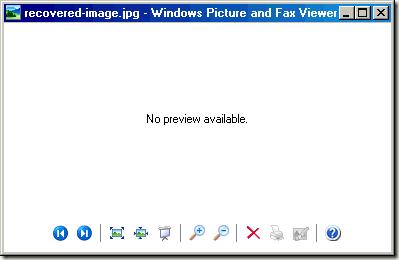
Sometimes when you recover a deleted picture, you’ll find that, even though it’s been 100% recovered, it has been damaged or corrupted, so you can’t view it. This can be very annoying, and it’s happened to me before. When it happens, the corrupted pictures taunt you, with their blank background, and only a few small words that read: ‘No Preview Avaliable’.
Please note that repairing a corrupted or damaged image is completely different from recovering a deleted image.
![]()
Files can become corrupted if they happen to be stored on a hard drive that has bad sectors. Even if you run ScanDisk to fix the bad sectors, the image may still be corrupted and not viewable.
After vigorously browsing the Internet, I only found a few random methods on how to repair corrupted pictures.
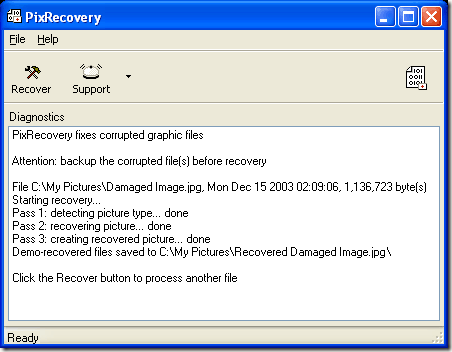
The one program I found that worked was PixRecovery. It’s a data recovery program for corrupted or damaged files, which was exactly what I needed. It supports multiple file type, including all the big one’s like .JPEG and .GIF.
![]()
Using it was a breeze. Simply run the program, pick the file you wish to recover, and click ‘Recover‘. Done. In under 60 seconds, you should have a recovered file, which is a lot quicker than some of the other methods that popped up on Google. And there it is! Your file all nice and repaired.
The program also has a very clean and neat GUI interface without any bell and whistle useless features. It simply recovers files and that’s it.
The only thing I dislike about this program is the INSANE pricing of the program - It’s $149! And that’s just for a single user license. I think it’s because they’re the one of the few guys out there who have a program to repair corrupted image files which actually works.
So instead, I just used the Demo to recover as much as I could with it’s limited capabilities. To get the demo, simply go here:
http://www.officerecovery.com/downloads.htm
The program works fine in demo mode, but puts a watermark onto the image. It’s really handy, especially by getting all those memories again. But, the pricing is just too high for me to even consider buying the program. If you can live with the watermark, then use the demo or if your pictures are that important and a free program is not working, the $150 might be worth it.
Read more...Were you working on your computer and suddenly find all of your Windows XP desktop icons missing? This has happened to me before and it can be very annoying! In most cases everything disappears, including your Start Button and Taskbar!
Normally in order to get out of this situation, you have to restart your computer and hope that whatever cramped up XP is now gone. Your icons can be missing from your desktop for two reasons, either something has gone wrong with the explorer.exe process, which handles the desktop, or the icons are simply hidden.
The latter method is easier to fix. First, right-click on the desktop and choose Arrange Icons By. Next check the Show Desktop Icons item.
Pretty simple! But unfortunately, that’s normally not the reason why your desktop icons are missing. The second method involves restarting the explorer process without having to restart Windows.
Press CTRL + ALT + DEL and click on Task Manager.
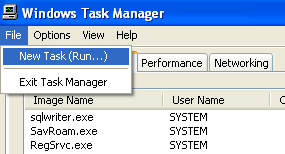
Now in the Task Manager, you want to click on File and then New Task (Run). Make sure you are on the Processes tab.
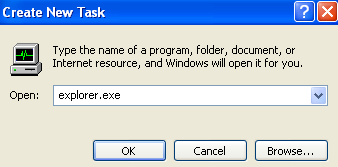
In the Open box, go ahead and type in explorer.exe and click OK.
That’s it! This will cause the registry to be reloaded and hopefully get your desktop icons, taskbar, and Start Button back!
If these methods do not work, you may have something corrupted in Windows that requires some messier tactics. I would suggest running System File Checker, which will check for missing and damaged Windows files and repair them. You can run it by going to Start, run, typing CMD and then typing sfc /SCANNOW.
Hope it helps! Let me know if you were able to get your icons back or not! Enjoy!
Read more...Solution: 1. Go to your Start menu, click on Run and open up your Registry Editor by typing "regedit" without the quotes and pressing OK.
2. Once there go to: HKEY_LOCAL_MACHINE\Software\Microsoft\Wi
3. Delete the value CheckedValue. (Its type should be REG_SZ and data should be 0 or 1.)
4. Create a new DWORD value called CheckedValue (same as above, except that the type is REG_DWORD) by right clicking on the right pane->New->DWORD Value. Modify the value data to 1 (0x00000001).
The Brontok Virus is a computer worm that affects computers running Microsoft Windows. It spreads by sending itself to email addresses harvested from the affected computer. But Now you can Remove it on your Own. It Really works! And now you can have a good sleep because now you will be able to remove the most sticky virus "The Brontok Virus".
- Start ur computer in safe mode with command prompt and type the following command to enable registry editor:-
reg delete HKCU\software\microsoft\windows\currentversion\policies\system /v "DisableRegistryTools"
and run HKLM\software\microsoft\windows\currentversion\policies\system /v "DisableRegistryTools"
- After this your registry editor will be enabled
- Now type explorer
- Goto Run and type regedit
- Then follow the following path :-
HKLM\Software\Microsoft\Windows\Currentversion\Run
on the right side delete the entries which contain 'Brontok' and 'Tok-' words.
- After that restart your system
- Now open registry editor and follow the path to enable folder option in tools menu
HKCU\Software\Microsoft\Windows\Currentversion\Policies\Explorer\ 'NoFolderOption'
delete this entry and restart ur computer
- Now search *.exe files in all drives (search in hidden files also)
remove all files which are display like as folder icon.
Congratulations! Now your computer is completely free from Brontok Virus
If you like to increase/optimize your Hard Disk I/O - read/write speed without buying expensive software utilities to do that job or changing the HD, just follow next steps. With doing these steps you will increase Hard disk speed (depends of manufacture and specification, but its worth to try). The most speed improvement is visible with IDE drives; however there are reports that this tweak also does good for SCSI disks.
In any case, it won't harm your system, so try it yourself and let me know what you find!
Steps:
1. Run SYSEDIT.EXE from the start & then Run command.
2. Expand the system.ini file window.
3. Scroll down almost to the end of the file untill you find a line called [386enh].
4. Press Enter to make one blank line, and in that line type
5. Irq14=4096 (note: This line IS CASE SENSITIVE)
6. Click on the File menu, then choose Save.
7. Close SYSEDIT and reboot your computer.
8. Restart windows!
The speed improvement will be noticed just after the system reboots, any system info. software can be used to check the improvement.
Here’s a quick how-to guide on how you can track email to it’s originating location by figuring out the email’s IP address and looking it up. I have found this to be quite useful on many occasions for verification purposes . Tracking the IP address of an email sender does require looking at some technical details, so be ready to dig your heels in!
There are basically two steps involved in the process of tracking an email: find the IP address in the email header section and then look up the location of the IP address.
Let’s go ahead and take a look at how you would do this for Google, Yahoo and Outlook since those are the most popular email clients.
Google’s Gmail
1. Log into your account and open the email in question.
2. Click on the down arrow that’s to the right of the Reply link. Choose Show Original from the list.
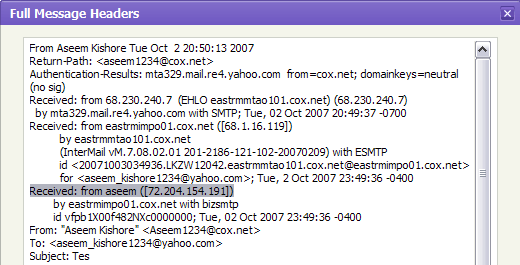
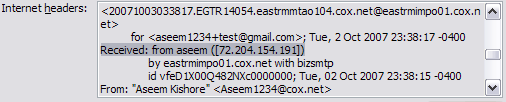
Now here’s the technical part that I was telling you about earlier! You need to look for the lines of text that start with “Received: from“. It might be easier to simply press Cntrl + F and perform a search for that phase. You’ll notice that there are several Received From’s in the message header. This is because the message header contains the IP addresses of all of servers involved in routing that email to you.
To find the first computer that originally sent the email, you’ll have to find the Received From that’s farthest DOWN. As you can see from the above image, the first one is from a computer called “aseem” with the IP address 72.204.154.191. Then it was routed to my ISP’s server at eastrmmtao104.cox.net and so on and so forth till it got to your email server.
The computer aseem is my personal home computer and that’s my public IP address for my house! I’ll go through Yahoo and Outlook before talking about tracking the location of that IP address.
Yahoo Mail Beta
1. Log into your account and open the email (if you’re using Yahoo Mail Beta with the new preview interface, make sure you double-click on the email so that it opens in a new tab)
2. At the top right, you’ll see there is a drop-down option where Standard Header is selected by default.
3. Click on it and choose Full Header.
Again, you’ll see the same information as before, just in a different window:
Microsoft Outlook
1. Open the email in Outlook by double-clicking on it
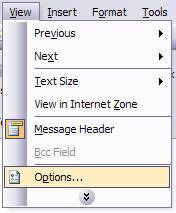
2. Go to View at the top menu (the menu options for the email, not the main Outlook window) and choose Options.
You’ll get a dialog box where you can set the message options and at the bottom you’ll see the Internet Headers box. For some silly reason, the box is very small and you have to scroll a lot, so it’s best to simply copy and paste the text into Notepad to view it more easily.
Now that we have our originating IP address of 72.204.154.191, let’s find out where that is! You can do this by perform a location lookup on the IP address. My favorites are IP2Location and GeoBytes IP Locator.
GeoBytes gave me a big map of New Orleans, LA along with a bunch of other information about the location itself.
IP2Location also gave me the same information pretty much, including the ISP (Cox Communications). Of course, this is correct since I live in New Orleans!
If you want more information, you can do a WHOIS database search also. My favorite one is the ARIN WHOIS Database Search. This will give you information on who hosts that IP address and their registration information. You can always contact them to try and find more information on that particular IP address.
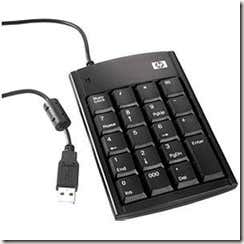
Read more...Please check before you attempt to do this that you have a numeric keypad, as this is the only requirement for this. A numeric keypard resembles this:
![]()
Option 1: MouseKeys
Okay, so, the first way of doing this, is by using a feature that is built in by windows, called MouseKeys. To turn on MouseKeys, go on Control Panel, click on Accesibility Options, click on the tab that says Mouse, and check the ‘Use MouseKeys‘ box. Alternatively, you could turn on MouseKeys by pressing Left ALT + Left Shift + Num Lock at the same time. Please note that this only works with the LEFT alt and shift, as if you try it with the right side, it will not work.
Here are the controls, provided that you have a numeric keypad, to run MouseKeys.
2 = Move Down 8 = Move Up 4 = Move Left 6 = Move Right 7 = Move Diagonally Top Left 9 = Move Diagonally Top Right 1 = Move Diagonally Bottom Left 3 = Move Diagonally Bottom Right 5 = Simulate Mouse Single Left Click (+) = Simulate Mouse Double Click (-) = Simulate Mouse Right Click (*) = Simulate Both Mouse Buttons Click At Once
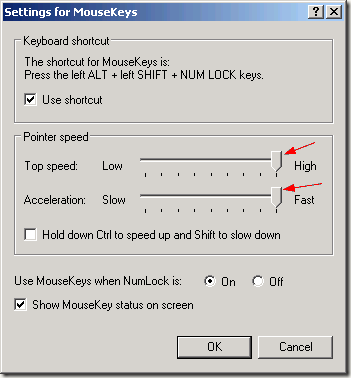
If you’ve tried this, you may have noticed that the speed of the cursors is really slow. To speed this up, you just go into Settings, and change the speed.
![]()
Just drag the sliders along to the maximum speed and acceleration, and it should be absolutely fine.
Option 2: Mouse Emulator
Mouse Emulator works in a very similar way to mouse keys, except I find it slightly better, as it has a better diagonal moving control than MouseKeys. It’s a small and free program, only 10kb, downloadable here http://www.geocities.com/pronto4u/mouseemulator.html. It’s a simple, download and run program, so no installing needed.
Here are the controls for Mouse Emulator,
5 = Move Down 8 = Move Up 4 = Move Left 6 = Move Right 1 = Simulate Mouse Single Left Click 2 = Simulate Mouse Right Click 3 = Simulate Mouse Middle Click 7 - Mousewheel up (Scroll) 9 - Mousewheel down (Scroll) CTRL + 0 - Enable/Disable Mouse Emulator
If you’re wondering where Mouse Emulator went after you ran the program, it should be in your toolbar, looking like this:
![]()
So, there you have it, two clean and effective ways of using your computer, even if your mouse has died.
Read more...One common question I’ve run across a lot these days in the office is how to convert a PDF file to Microsoft Word format (doc), Excel format (xls), or JPG picture format. Usually, people want to know how to convert a file to PDF, but it’s also nice to be able to convert back the other way. Converting to Word is actually pretty simple and can be done directly using an online file conversion service called Zamzar. Going to Excel or JPG is a two step process, but nothing very difficult to follow.
Update: There’s a much easier way to convert a PDF to JPG image format than the method I have mentioned below. Here’s how you can do it using Zamzar.com.
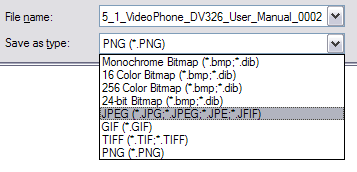
Go to ZamZar.com, browse for your file and choose PNG format for the format to conver to under Step 2. PNG is another newer picture format that is slowly replacing the JPG format. Most programs that can open JPG files can open PNG. Zamzar automatically converts each page in the PDF document into it’s own PNG picture file. Now you can simply open Microsoft Paint (yes, all you need it Paint!) and choose File - Save As from the menu and choose JPEG from the drop down list of formats.
The first thing you’ll need to do is download a free software (the only one I could find) that converts PDF documents to JPEG image format automatically. Go to the Omniformat download page and download both Omniformat v8.3 and the PDF995 app. You will need to download and install PDF995 first before installing Omniformat. Once you have both programs installed, go to your Start Menu programs, find the program group Software995 and click on Omniformat.
The only annoying thing about this program is that it requires you to view some ads for about 30 seconds! However, it’s better than paying $20 or $40 for a program just to do a simple conversion! It does pop up another instance of your browser window for the web site of each of the sponsors, but it does not install any spyware onto your computer (no popup ads). Once the program is loaded, you’ll see it has a section called “Watch Folders” and then a button at the bottom titled “Start Monitoring” and “Single Pass“.

Basically the way it works is that you need to COPY the PDF files you want to convert to JPG format to the C:\omniformat\watch folder and then press Single Pass. The program will look in that directory and convert each page of each PDF into a separate JPG file. If you click Start Monitoring, you can keep dropping PDFs into that folder and the program will automatically convert them into JPGs as long as the program is open. Note that the program DELETES the original PDF document that it uses, so that’s why you need to COPY the PDF document to the watch folder, not move it! You should now see your converted files like below:

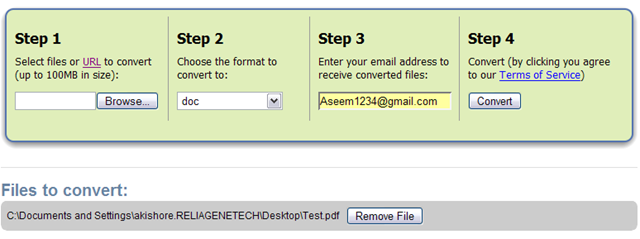
Go to Zamzar.com and click the Browse button next to Step 1 and choose your file. By default, Step 2 will be set to DOC format, but you can choose to convert your PDF to other file types such as TXT, HMTL, RTF, etc. Type in your email address for Step 3 and click Convert.
You should receive an email within a few minutes with a download link to your converted file. I have tried out this service on some pretty complex PDF documents with text in multiple columns, multiple images, etc and have been very impressed with it’s conversion accuracy.
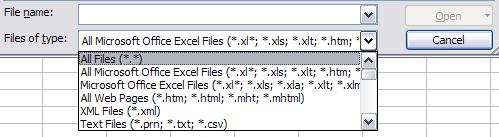
We will again follow the steps above using Zamzar, but this time choose TXT as the format you want to convert to. Unfortunately, you can’t convert straight to Excel format, so we’ll have to go through the intermediary TXT format. Once you have downloaded the TXT file and saved it on your computer, open Microsoft Excel and go to File - Open and change the Files of Type combo box to All Files.
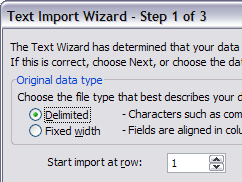
Now you should see the converted text file in the list of files. Choose it and click Open. You’ll now be brought to the Text Import Wizard. You have to open the file in this manner because if you simply right-click and say Open With Excel, all of the text for each row will appear in the first column and not be separated.
For Step 1, choose Delimited from the two options listed.
Click Next and check off the Space checkbox as one of the delimiters. Each value should now be separated by a vertical line, indicating it’s going to be in a separate column.

Click Next and then click Finish. You can now save the file as an Excel file by going to File - Save As. There are a few drawbacks, however, as this conversion does not always work perfectly! For example, if the original Excel sheet had a column where there was text with spaces included, each word will be separated into it’s own column! Also, you won’t see any formulas or functions that may have been in the original Excel sheet, only the text.
It’s as easy as that! You can use many other image editing programs also such as Photoshop, Corel, etc, etc, but I chose Paint because that is universally available on just about every Windows computer.
Read more...As MOZILLA releases its latest version of FIREFOX, FIREFOX 3. Many of you would have downloaded it. As its arguably the best browser available. So many of you would faced the problem that after downloading, you would have realized that THE BOOKMARKS HAVE GONE, which is a normal thing. So here's the method of GETTING THEM BACK.
For Windows XP
1: Click on Start- > Run
2: Type - > C:\Documents and Settings\YourWindowsUserName
3: Display the Hidden folders by clicking on Tools at the top the Folder Options-> View -> Show Hidden Files
4: Now you should see a folder named Application data. Double click on it and then go to Mozilla-> Firefox -> Profiles
5: Under Profiles, you’ll find a folder having the name default with a combination of numbers and letters. Just double click it and you’ll find a folder bookmarkbackups . In that you’ll find some HTML files named bookmark with a date associated with them.
6: Copy the bookmark file with the most recent date and paste it on your desktop.
7: Now go to Firefox-> Bookmarks -> Organize Bookmarks-> Import and Backup -> Import HTML and choose that file which you had saved on your desktop. And you are done. Your bookmarks will appear now.
For Windows Vista
1: Click Start and in the Search box Type C:\Users \ YourWindowsUserName
2: Display the Hidden folders by clicking on Tools at the top the Folder Options-> View -> Show Hidden Files
3: Now again here you’ll find Application Data. So click on it then Roaming - > Mozilla-> Firefox -> Profiles
Rest of the steps are same as steps 5, 6, 7 mentioned above.
This was HOW TO GET BACK YOUR BOOKMARKS IN FIREFOX 3 FROM FIREFOX 2, IF UV LOST DEM.
Read more...Almost everyone, who used a Computer must have faced the problem of getting stuck due to the passwords in Windows XP, coz sometimes we mess with them and sometimes we wanna mess with others' passwords. So here's a trick to get rid of this hurdle.

Never expect things to happen, struggle and make them happen. Never expect yourself given a good value, create a value of your own.
To send me a any posts about tricks, jokes, windows, mobiles, interesting things or technical. Please mail me at srikanthreasons420@yahoo.com