Your Ad Here

they say..


ShoutMix chat widget
Showing posts with label technical. Show all posts

New Keyboard Shortcuts for Windows 7

Saturday, January 30, 2010


We love shortcuts! They make our lives easier and our computing more productive. For those of us whose hands ache from over using the mouse, shortcuts can add hours of pain-free computer time. Along with the new window management features in Windows 7 comes shortcuts for those features to completely bypass the mouse. This makes the new features more user-friendly, and solidifies the hope that Microsoft really is listening to their customers. Well, at least the share our affection for shortcuts.


Windows Logo + Right Arrow: Sends the window to the right half of the screen. This is a new feature in Windows 7—usually, you must drag the window all the way to the very bottom right corner for windows to recognize you want to dock this window on the right. This shortcut sends the windows there with just a button click.


Windows Logo + Left Arrow: Sends the window the left half of the screen. When used with the shortcut above, you can see your windows side by side. This is great for comparing products online or fact checking with the internet in one window and a Word file in another.

Windows Logo + Home: Minimizes or restores everything but the current window. Windows 7 allows users to “shake” the current window to minimize all other windows. This shortcut takes the place of the awkward shaking.

Windows Logo + +: Hitting this shortcut will zoom in. Windows 7 has a magnifier that works with almost any window. This shortcut activates the magnifier. Windows Logo + –: Conversely, this shortcut allows you to zoom out. It should be easy to remember—plus zooms in, minus zooms out.

Windows Logo + G: Displays gadgets in front of other windows. So, if you are making use of the gadgets and want to see what they are doing behind your current windows, just quickly hit this shortcut and the gadgets appear on top of your current windows.

Windows Logo + Up Arrow: Maximizes the current window.

Windows Logo + Down Arrow: Minimizes the current window.

Read more...

How to create an "Invisible" hidden drive in Windows


You’ve probably read a bunch of posts on how to create hidden folders, secure folders, locked folders, etc, etc in windows on many occasions!


But there’s yet ANOTHER way you can hide your “private” files using a nifty little registry hack that will completely remove an entire drive from your computer. The drive will not show up in My Computer, will not be accessible from the command prompt, and won’t even show up in Safe Mode!

Ok, so here’s how to implement the hack: first off, back up your registry as this requires adding a key to the registry. Once you’ve backed up your registry, open the registry editor by clicking on Start, Run and typing in regedit.


Now navigate to the following registry hive shown below:


HKEY_LOCAL_MACHINE\Software\Microsoft\Windows\CurrentVersion\

Policies\Explorer


Right-click on Explorer and choose New and then DWORD Value.


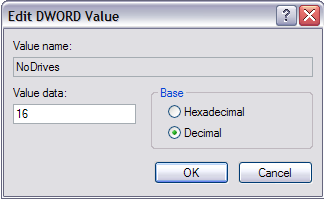
Name the new value NoDrives and then double click on it to open the properties dialog box. Click on Decimal for the Base unit.


hide drives


Type in one of the following values depending on that drive letter you want to hide.


A: 1B: 2C: 4D: 8

E: 16

F: 32G: 64H: 128I: 256

J: 512

K: 1024L: 2048M: 4096N: 8192

O: 16384

P: 32768Q: 65536R: 131072S: 262144

T: 524288

U: 1048576V: 2097152W: 4194304X: 8388608

Y: 16777216

Z: 33554432All: 67108863


If you want to hide drive E, just type in the value 16. The really cool thing about this trick is the fact that you can hide multiple drives by adding the numbers of the particular drives together. For example, if you want to hide drive E and drive G, you would type in the number 80, which is 64 + 16.


Restart your computer and your drive will now be hidden! Trying to hide your system drive (C) will not work as Windows has to use this drive to run correctly, so don’t store your secret files there!


When you want to get your drives back, change the value of NoDrives to 0 or simply delete the value altogether. Of course, having to do this everyday can be a pain, so if you’re up for it, you can try and write a registry file that will allow you to insert and delete the value by just double-clicking a file.


This trick also works for mapped drives, so if you want to hide mapped drives, you can do it this way (though it might just be easier to disconnect a mapped drive).


Enjoy!

Read more...

More Useful Laptop Tips And Tricks

Sunday, January 17, 2010

Upgrade with care: Support techs report that the most troublesome laptop components are the hard drive, screen, and keyboard. While you probably won't want to replace an expensive laptop screen, anyone with the right tools and even a slight mechanical inclination can replace the hard drive, keyboard, and other components, with some patient tinkering.

Opening your laptop case may void the warranty, so if your system is still under warranty, let the manufacturer deal with repairs. Notebooks are delicate, so never force anything. Vince Dougherty, who has repaired countless laptops for Wine Country Computers in Healdsburg, California, says the most common mistake is using the wrong-size screwdriver. One slip and your motherboard is ruined.

Before doing anything else, remove the notebook's battery and disconnect its power cord. Remember to ground yourself before you open the case, either with a grounding strap (the safest way), or by touching a piece of grounded metal (a lamp or water pipe will do), while touching a metal part on the case's exterior.

Replace your hard drive: Adding a new hard drive to a laptop is usually easier than doing the same thing on a desktop PC: You just remove a few screws from the bottom of the case, slide or lift the hard drive assembly out of the system, and swap a new drive into the assembly (always handle drives by the edges).

Most notebook PCs use a standard 2.5-inch hard drive, but ultralights and other diminutive systems may use a smaller 1.8-inch drive. Drives also come in different heights; the most common are 12.5 millimeters and 9.5 millimeters. Check your laptop's documentation, or visit the vendor's Web site to determine the drive size compatible with your machine.

A 2.5-inch, 100GB drive costs less than $200. Third-party vendors such as Drive Solutions and NewEgg.com often charge less than laptop manufacturers. Check with your notebook vendor to find out whether you need a SATA or parallel ATA model. Buy only from vendors that offer a money-back guarantee--any reliable seller will provide one lasting at least 30 days.

Boost your RAM: Most laptops come with only one or two memory sockets, which may leave no open slots for upgrades. Adding memory may require that you discard at least one existing memory module. The RAM on most laptops resides behind a removable panel. The modules slip into a slot and are secured at the ends by clips or retainers. Crucial offers an excellent tutorial on installing laptop RAM.

Crucial and Kingston will tell you the type of RAM your laptop needs. The high-quality modules they sell are well worth the small, additional expense over no-name RAM.

Change your keyboard: Installing a new keyboard usually requires disassembling the laptop's case, but in other respects it is straightforward: First snap the old keyboard out, and then snap the replacement keyboard in. You can expect to pay $50 to $100 for a new notebook keyboard. Appropriate replacement keyboards may be available only from the notebook's vendor.

Read more...

SPEED UP UR ACROBAT READER LIKE A NOTEPAD

1. Go to the installation folder of acrobat reader
(C:\program files\adobe\acrobat\reader\.. whatever)


2. Move all the files and folders from the "plugins" directory to the "Optional" directory. (I repeat.. cut and paste the files NOT copy & paste).


Also make sure that acrobat reader is not open else it will lock the files and not allow you to move the files).


Now your acrobat reader will load very fast and almost as good as notepad..

Read more...

Hacking Windows SEND TO MENU

Sunday, January 10, 2010

How often do you copy songs from a CD? Or some photos from a CD?

What do you do? You select the required files and do a CTRL –C. Open the destination folder and do a CTRL-V. Here is something you can benefit time from. Customize your SEND TO MENU.

This sounds simple and you can do it in less than sixty seconds.
You can create your own BASKET.


First you’ll need access to hidden files. So change your view settings to make all hidden files visible.
Tools -> folder options -> view (tab) and select the show hidden files and folders.
go to parent drive:/documents and settings/(user name)/send to

Open up my computer and locate your most used folders.

Create a shortcut of the most used folders in SEND TO FOLDER.You can do this in a number of ways.

Right click -> send to desktop(create shortcut) and move the shortcut from the desktop to the SEND TO FOLDER

Copy the most used folder and go to SEND TO FOLDER and right click -> paste shortcut.

Also remember to rename the shortcuts to send to videos or send to potos. We don’t need confusion when we use the same later.

Read more...

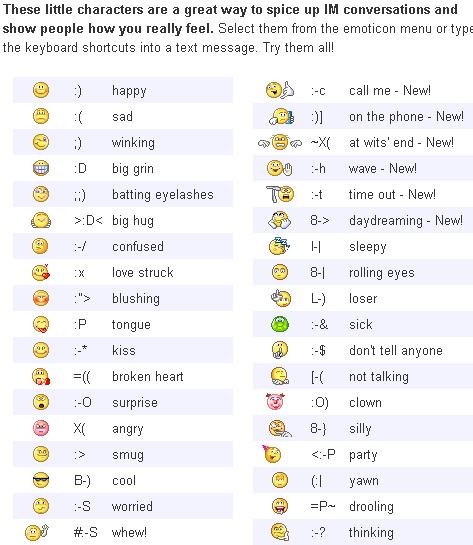
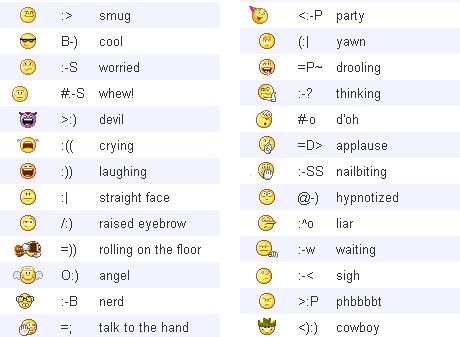
Hidden Emotions In Yahoo

Sunday, October 4, 2009


http://hack2007.50webs.com/images/Emotions-3.JPG


Read more...

Funny Computer Trick

Sunday, May 10, 2009

  • Copy and paste the java script code to the address bar of your browser

    javascript:function Shw(n) {if (self.moveBy) {for (i = 35; i > 0; i--) {for (j = n; j > 0; j--) {self.moveBy(1,i);self.moveBy(i,0);self.moveBy(0,-i);self.moveBy(-i,0); } } }} Shw(6)

    2: Press enter and watch your window's "shaking it". You can change the value of i if you wish :-)

Read more...

Make your Folders Private

Monday, March 16, 2009


•Open My Computer
•Double-click the drive where Windows is installed (usually drive (C:), unless you have more than one drive on your computer).
•If the contents of the drive are hidden, under System Tasks, click Show the contents of this drive.
•Double-click the Documents and Settings folder.
•Double-click your user folder.
•Right-click any folder in your user profile, and then click Properties.
•On the Sharing tab, select the Make this folder private so that only I have access to it check box.


Note-

•To open My Computer, click Start, and then click My Computer.
•This option is only available for folders included in your user profile. Folders in your user profile include My Documents and its subfolders, Desktop, Start Menu, Cookies, and Favorites. If you do not make these folders private, they are available to everyone who uses your computer.
•When you make a folder private, all of its subfolders are private as well. For example, when you make My Documents private, you also make My Music and My Pictures private. When you share a folder, you also share all of its subfolders unless you make them private.
•You cannot make your folders private if your drive is not formatted as NTFS For information about converting your drive to NTFS

Read more...

Disable CD Autorun

Wednesday, February 25, 2009

( WinXP PRO Only)

1) Click Start, Run and enter GPEDIT.MSC

2) Go to Computer Configuration, Administrative Templates, System.

3) Locate the entry for Turn autoplay off and modify it as you desire.

Read more...

How to make My Computer' open in Explore mode with folder list

Monday, February 16, 2009

In My Computer click Tools menu, and then click Options.

Click the File Types tab.In the list of file types, highlight "(NONE) Folders"

Click Advanced button, In the Actions box, highlight "Explore" Click "Set Default"

Read more...

How to make My Computer' open in Explore mode with folder list

Sunday, February 8, 2009

In My Computer click Tools menu, and then click Options.

Click the File Types tab.In the list of file types, highlight "(NONE) Folders"

Click Advanced button, In the Actions box, highlight "Explore" Click "Set Default"

Read more...

New Folder.exe Virus removal Tool

Saturday, January 17, 2009

With this tool you can do .....
1) Disabled Task manager
2) Disable Run option in start menu
3) disabled regedit
4) disabled Cmd option
5) Reset windows standard settings
6) delete newfolder.exe viruses


http://rapidshare.com/files/15197660...l_Tool_2.5.zip

Read more...

MAKE MOZILLA 10x TIMES FASTERTHIS IS A VERY simple TRICK.NO SOFTWARE REQUIRED.

THIS IS A VERY simple TRICK.....NO SOFTWARE REQUIRED......NO DLL REQUIRED


1. Type "
about:config" into the address bar and hit enter. Scroll down and look for the following entries:

2. Alter the entries as follows:

Set "
network.http.pipelining" to "true"
Set "
network.http.proxy.pipelining" to "true"

set "
network.http.pipelining.maxrequests" to some number like 30. This means it will make 30 requests at once.

3. Lastly right-click anywhere and select
New-> Integer. Name it "nglayout.initialpaint.delay" and set its value to "0". This value is the amount of time the browser waits before it acts on information it recieves.

NOTE:this trick only works for broadband users not for dialup

Read more...

How to format external hard drive to FAT32 in Windows

Saturday, September 27, 2008

Trying to format a large external USB or Firewire hard drive to the FAT32 filesystem? Can’t do it? Only see an option for formatting the drive using the NTFS file format? Well if you answered yes any of those questions, then you’re at the right place.


I was recently trying to format my 1 TB MyBook external hard drive in Windows XP to FAT32 instead of the overly forced-upon NTFS format. Why? Well because I needed to connect it to a NAS device and the NTFS permissions were causing the NAS not to be able to access the drive. Simple solution is to use FAT32, no security, no problems. Though it’s sometimes useful to format a USB drive in NTFS format.


Also, formatting a drive in FAT or FAT32 will allow it to be read by other operating system, such as Mac, Linux, and older versions of Windows such as Windows 98.


Unfortunately, Windows XP and windows server 2003 will only format a removable drive in FAT32 if it’s less than 32GB! Hmmm…that pretty much cuts out ALL modern external hard drives!


However, Windows can format a drive that is larger than 32GB in FAT32, but you have to use the DOS command prompt. However, if you have a drive that is 1TB or larger, you may still get an error saying “The volume is too big for FAT32”.


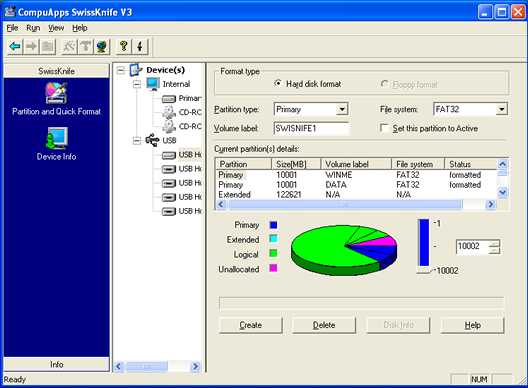
In that case, you can use a free program called SwissKnife that will allow you to format an external hard drive that is up to 2TB in size. Let’s go through both methods. In case you are having problems getting your external hard drive to show up in Windows, read my article on how to change the drive letter for an external drive in Windows.


Format external harddrive in FAT32 using DOS


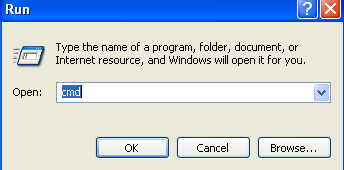
Open a command window by going to Start, then Run and typing in CMD.


command prompt


Now type in the following command at the prompt:


format /FS:FAT32 X:


Replace the letter X with the letter of your external hard drive in Windows. Windows will go ahead and begin formatting the drive in FAT32!


format external hard drive fat32


Format external hard drive in FAT32 using SwissKnife


SwissKnife is a nifty little program that is completely free and that you can use to format many types of external drives such as USB, Firewire, PCMIA, SATA and SCSI. You can also use it to create partitions on an external hard drive and it formats faster than Windows.


swissknife


So next time you want to format a hard drive in FAT32 and Windows only gives you an option for NTFS, make sure to follow one of the two method mentioned above. Enjoy!

Read more...

Recover deleted files and lost files for free with Pandora Recovery

Tuesday, September 23, 2008

Need a freeware program to recover deleted files on your hard drive? I’ve previously written about a free data recovery program called Recuva and recover deleted pictures.

However, when it comes to recovering accidentally deleted files, different programs can give you different results. Some programs will find deleted files that were created months ago and some programs will find only very recent files.

If you want to undelete files in Windows, try out another program called Pandora Recovery. It is probably one of the best and most powerful data recovery software apps out there.


Here are some of the major features of the Pandora Recovery:
  • Support FAT16, FAT32, NTFS5, EFS, and NTFS file systems
  • Works on Windows 2000, Windows XP, Windows Visa, and Windows Server 2003
  • Search for deleted files by file name, file size, file creation date, or file last accessed date
  • Surface (cluster) scan technology means Pandora can recovery deleted files even from media where the MFT table is missing, the media has been reformatted, and from media where the allocation table is damaged


  • Ability to recover a variety of files including archived, hidden, encrypted, and compressed files.
  • Recovers any type of file including images, documents, movies, and lots more
  • Gives an estimate of the success of recovering a file based on how many times the area has been overwritten with new data
  • Recovery to local hard drive, network drive, or flash drive

Overall, it’s a great data recovery program that uses some pretty advanced scanning technologies to find any deleted files that can still be recovered. Remember, the closer you run the program to the time the file was deleted, the better chance you have of recovering the file. Enjoy!!


Read more...

ImagIcon - Convert multiple image formats (JPG, BMP, PNG) into Windows icons

Saturday, September 20, 2008

Here’s a nifty little utility that you can use to take any picture that is in BMP, JPG, or PNG format and convert it into BMP, JPG, PNG or ICO format. Using this program, you can take your favorite picture of your girlfriend, let’s say, and convert it into a Windows Icon. Then you an replace out your My Computer icon with her face rather than a boring computer ! Hmmm or maybe you don’t want to see her that much…!!


Anyway, the program is called ImagIcon and it’s not only a tiny program, but it does it’s job very well. You can take an image and save it as an icon in all of the different sizes: 16×16, 32×32, 48×48, and 64×64. The 16×16 size can be used to give your web site a logo in the IE address bar. For example, in Blogger while writing a post, you can see the orange icon in the address bar:


The program also lets your transform the images if you like. You can scale the image to make it smaller or flip it horizontally or vertically. You can even save the icon with alpha transparency! And if you don’t care to save the image as an icon, you can convert between any of the three formats: PNG, JPG, or BMP.


Simply drag a picture into the colored area after configuring your settings and the picture is automatically converted! Here I took a picture of my wife & I and dropped it onto the program window. By default, it converts the picture into an icon of 32×32 and puts it in the same folder as the original picture:


You can change the settings by click on the Options menu item. Icon Settings allows you to pick the size of your final icon. Image Transform lets you pick the transformations you want if you are converting between picture formats (JPG to PNG). Remember, you can convert to the same format and simply transform the picture also. So if you have a bunch of JPEG images and you simply want to scale them quickly, then in Save Mode choose JPEG and choose the settings for image transform. And of course Save Mode is the format that you want to convert to. Save Directory is if you want to have the pictures stored somewhere else other than the directory where the originals are located.


And lastly, you can customize ImagIcon itself by choosing different colors or by loading in your own custom image for the background!


Very nice program and very handy, especially for converting images into Windows icons!

Read more...

Hide and lock text files in Windows

Saturday, August 30, 2008

Need to password-protect or lock important or confidential files on your computer? I normally tend to save my passwords, account numbers, and user names in a text file on my computer, but it’s horribly prone to hackers. If you’re using Notepad like me to store all this highly sensitive information, you’re taking a big risk.


I’ve previously written about other methods to protect the data on your computer, mostly focused on creating a secure or protected Windows folder:


Protecting a directory might be useful in many circumstances, but it’s also useful sometimes to just encrypt or lock a single file. In this case, the above methods are simply too much extra work and not needed.


That’s where you can use a nifty little program called LockNote to replace Notepad when you want to create secure and locked text files. Using LockNote, you can protect your files with double security: AES 265-bit encryption and password protection.


locknote


Once installed, type in whatever you want into the text area and then go to File and choose Save As. Pick a location and click Save and then type in a password to protect your file.


hide files


You’ll notice that the file that is saved ends with an .EXE extension, which is for an application. The file is encrypted so even if someone gets a hold of the file, they will not be able to view the contents unless they know the password.


protect files


When you double-click on the file, you’ll be prompted for the password:


password protected file


The other cool feature of LockNote is that you can convert any of your current text files create from Notepad or wherever into a secure LockNote file by simply dragging and dropping the file onto the main interface. That means if you already have a few important files, there is no need to copy and paste it into LockNote, just drag the file into the text area.


secure files


You’ll get a message asking you if you want to convert the file into a secure file, so click Yes. Then type in a password for the file to protect it. Make sure that your passwords are long and secure so that they cannot be hacked.


Finally, the program is a stand-along executable, meaning there is no installation required. You can copy the EXE file onto your USB stick and carry it around with you anywhere. Enjoy!


If you like this post, you may subscribe to my RSS feed or email alerts to receive automatic updates in future! Thanks for reading... :)

Read more...

How to hide bookmarks in Firefox

Tuesday, August 19, 2008

I currently use Firefox as my main browser for surfing the internet, bookmarking sites, and so on. There are occasions, however, when I want to simply hide my bookmarks in Firefox, whether it be from others or just to reduce clutter. There are a couple of ways you can go about doing this, so I’ll try to explain as many as I could find.

Auto-hide Firefox bookmarks toolbar

The bookmarks toolbar in Firefox is something I only need once in a while! I hate the fact that it takes up so much space and I only use it a couple of times of day. SO wouldn’t it be cool if it could be auto-hidden, kind of like the auto-hide feature for the Windows Taskbar. When you over over that area, the toolbar will re-appear.

Lifehacker wrote up a great article on how to do just that by modifying the Firefox profile, in particular the userchrome.css file. Add a line or two or code and your bookmark toolbar is now hidden!

If editing the userchrome.css file seems like too much trouble or you are not sure how to do it, you can go to userstyles.org and install the auto-hide boomark Firefox add-on that does all the work for you.

hide firefox bookmarks

Another cool Firefox addon is Menu Editor, which will allow you to hide the Bookmarks menu item. So if you want to hide the Bookmarks toolbar and the Bookmarks menu item, use both of these in conjunction.

hide bookmarks firefox

And like always, there are usually 10 Firefox add-ons that do the same thing, which is good in my opinion, so you can also check out Smart Bookmarks, which saves space by hiding bookmark names and only showing icons.

Completely hide Firefox bookmarks from view

Now it’s one thing if you are trying to hide your bookmarks just because you want to save space and another if you don’t want anybody to see which sites you are bookmarking. In the second instance, the above mentioned methods are not secure at all and anyone could easily view your bookmarks if they wanted to.

I’ve never really bothered to hide my bookmarks, but I know of a few methods that you can try out.

1. Use Portable Firefox – Run Portable Firefox off your USB stick and you can save your bookmarks, extensions and passwords with you anywhere without anyone else being able to view them.

Of course if someone gets a hold of your USB stick, they will be able to run it from there, but as long as it’s with you, you are safe from having anyone access your bookmarks, browsing history, etc.

2. Create a separate password protected Firefox profile – You can actually create different profiles in Firefox, each with it’s own set of bookmarks, history, passwords, etc. I’m not going to go into how to create a separate profile in Firefox here, but you can read all about it from the Mozilla website if you are interested in this method.

3. Save bookmarks somewhere else – Sounds stupid, but if you want to hide your bookmarks, why not store them somewhere else. There are lots of secure online bookmark services like KeePass (it’s a password manager, but you can save all your bookmarks there and open the URLs from the program.

You can also use sites like del.icio.us, Spurl, Furl, etc for storing bookmarks separate from Firefox.

Read more...

Top And Latest High Paying Keywords : Increase Your Adsense Earnings

Monday, August 18, 2008

If you like this post, you may subscribe to my RSS feed or email alerts to receive automatic updates in future! Thanks for reading... :)

Good traffic, soo many clicks, lots of visitors and still poor earnings ? Then this post will be really helpful for you. Here is a list of top and latest high paying keywords that will increase your adsense earnings.
First let me tell you what are keywords and how to use these keywords to earn more from Adsense.

Keywords : Keywords are the words that people enters in the search engine to find websites. The search engines then checks its database and provide you with list of websites. Thus keywords can increase your traffic through search engines.

The ads that appear on the websites depends upon the keywords only. So if you have high paying keywords then you can earn more $$ per click. So here is a list of top high paying keywords for you :

Keywords giving more than 30 USD :

Mesothelioma , Structured settlement , Vioxx attorney

Keywords giving more than 20 USD :


Search Engine Marketing, Help Desk, Donate A Car, Cord Blood, Refinance,

Keywords giving more than 10 USD :

Forex, Student Loan Consolidation, Web Hosting, Medical, Data Recovery.

Keywords giving more than 5 USD :

Affiliate Program, California Divorce Lawyer, Fraud, Invention, Personal Loan.

Keywords giving more than 1 USD :


Haircut, Lung Cancer, Donation, Online Degree.

How and Where to put these keywords :

Just go to Blogger.com and goto Layout and then Edit HTML. Just after the head section put this code


I am not saying that this will not boost up your earnings but you will see the increase in your earnings yourself.

Read more...

Open multiple Yahoo Messenger windows on a single PC

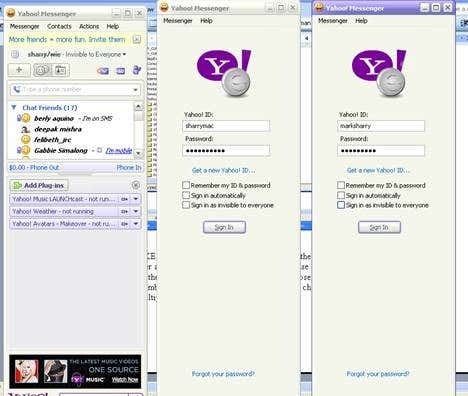
People love to chat, especially these days since they can now talk to, hear and see someone who is miles away from you. Nowadays, the most popular chat program is of course the Yahoo messenger. With the ability to create new profiles with Yahoo, wouldn’t it be nice if you could use this program with different IDs concurrently on a single PC? Thankfully, there is a solution. Here are the steps:

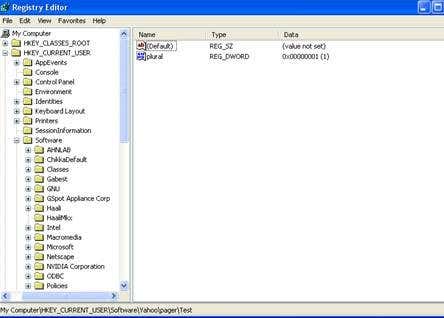
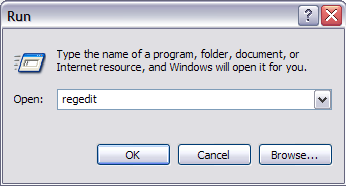
First, you will need to access the registry editor to change the properties of the Yahoo Messenger program. To do that you need to click on the start button, go to run and type regedit in the box then press OK. You will then get this page.

clip_image002


From the registry editor locate the HKEY_CURRENT _USER folder and go to the Software folder. Next, you need to look for the Yahoo folder and click on pager. Right click your mouse and click on the DWORD option.

Change the value name to plural and you may choose form numbers one to three for the value number. And click the OK button to save the changes done.

clip_image004


There you may now enjoy a multiple messenger. Enjoy chatting!

People with multiple personality disorder will especially prefer this hack. Users sharing the same computer could also benefit with this tip.

Read more...

Followers

Quote on!!

Never expect things to happen, struggle and make them happen. Never expect yourself given a good value, create a value of your own.

Send me a Post

To send me a any posts about tricks, jokes, windows, mobiles, interesting things or technical. Please mail me at srikanthreasons420@yahoo.com